Category Archives: Furniture Projects

Walk through my recent projects

Recap errors and how I “fixed” them

Finish_3

The dresser is complete and finished, but what about the rest of the story?  What happened in the background that caused me problems?  Mistakes.  Lots of mistakes.  With this post I’ll attempt to be transparent with my biggest mistakes and recap how I “fixed” them.  Maybe it will help someone else in their moment of frustration.

Back_8

1 – With a previous post I showed how to fit an out of square back.

Case_Glueup_11

2 – In another post I showed how to fit drawer fronts to non-square drawer openings.

VD-27

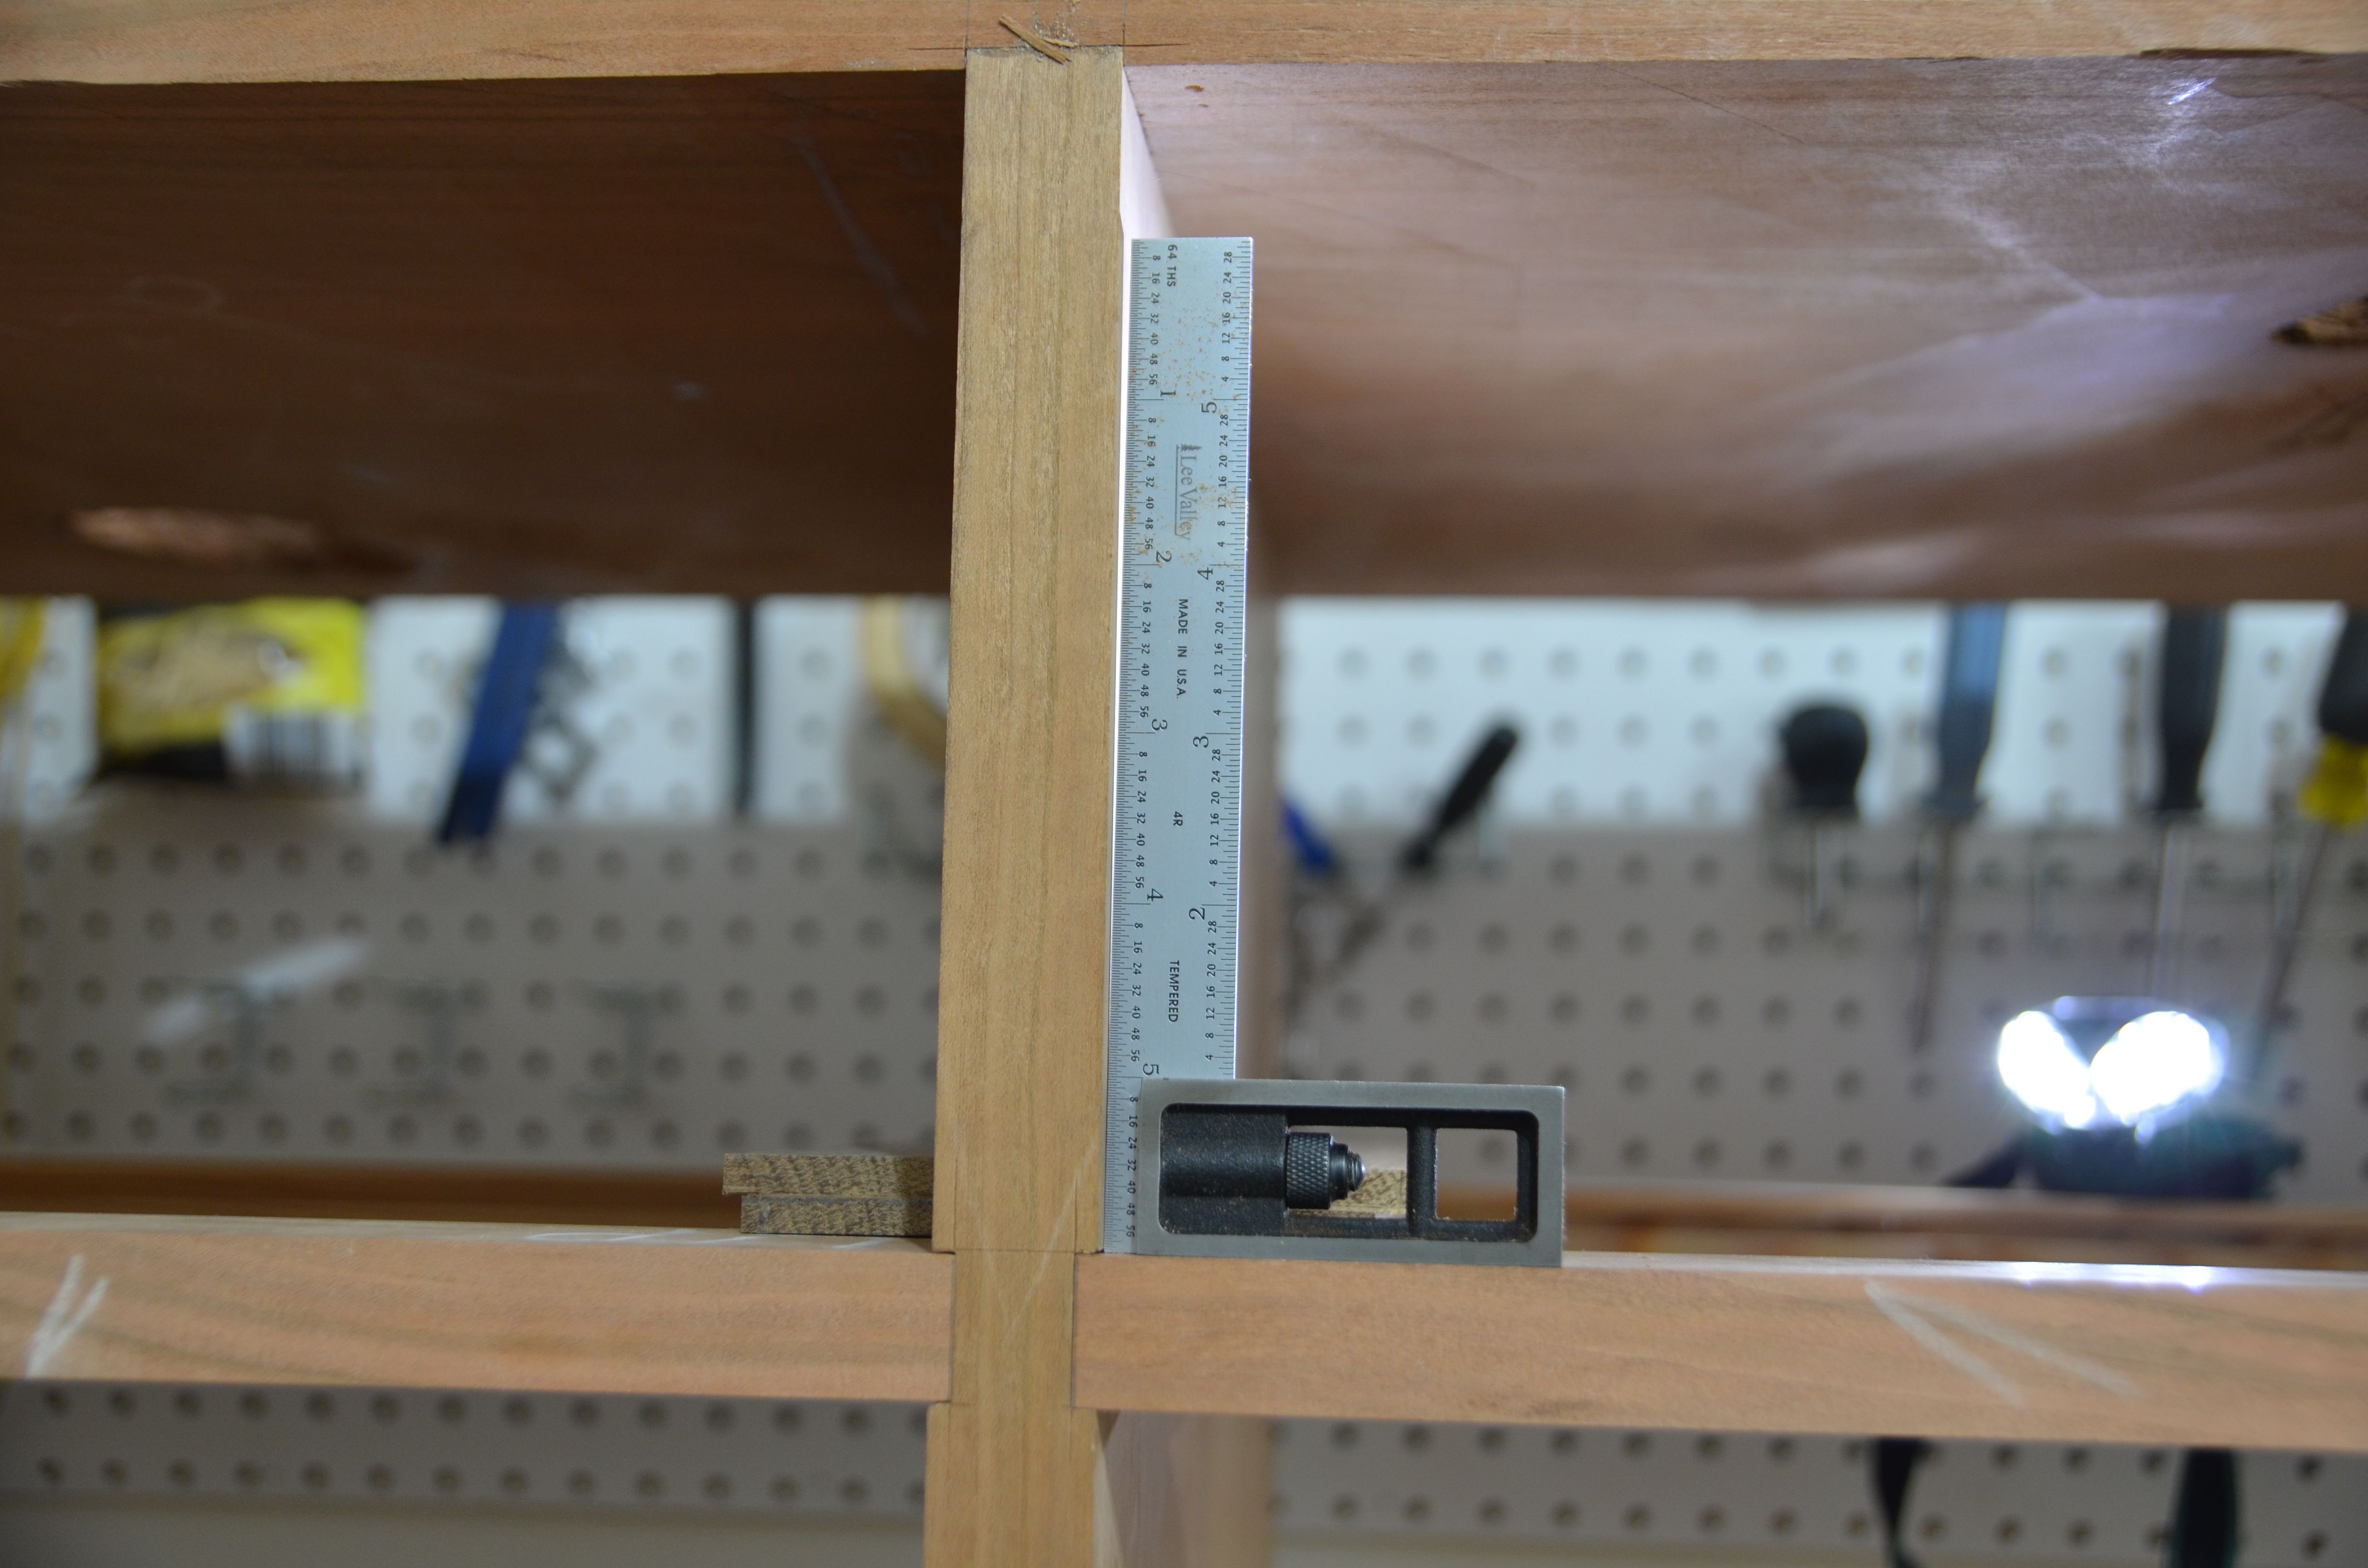
3 – Mortise/tenon malalignment in the vertical divider.  Fix described in a previous post.

Case_Glueup_10

4 – Splits in the vertical divider.  Fix? I planed both sides of the board (inside the case) smooth enough that the drawers did not stick during use.  The splits are still there, but not visible unless the bottom drawers are removed.

P1-6

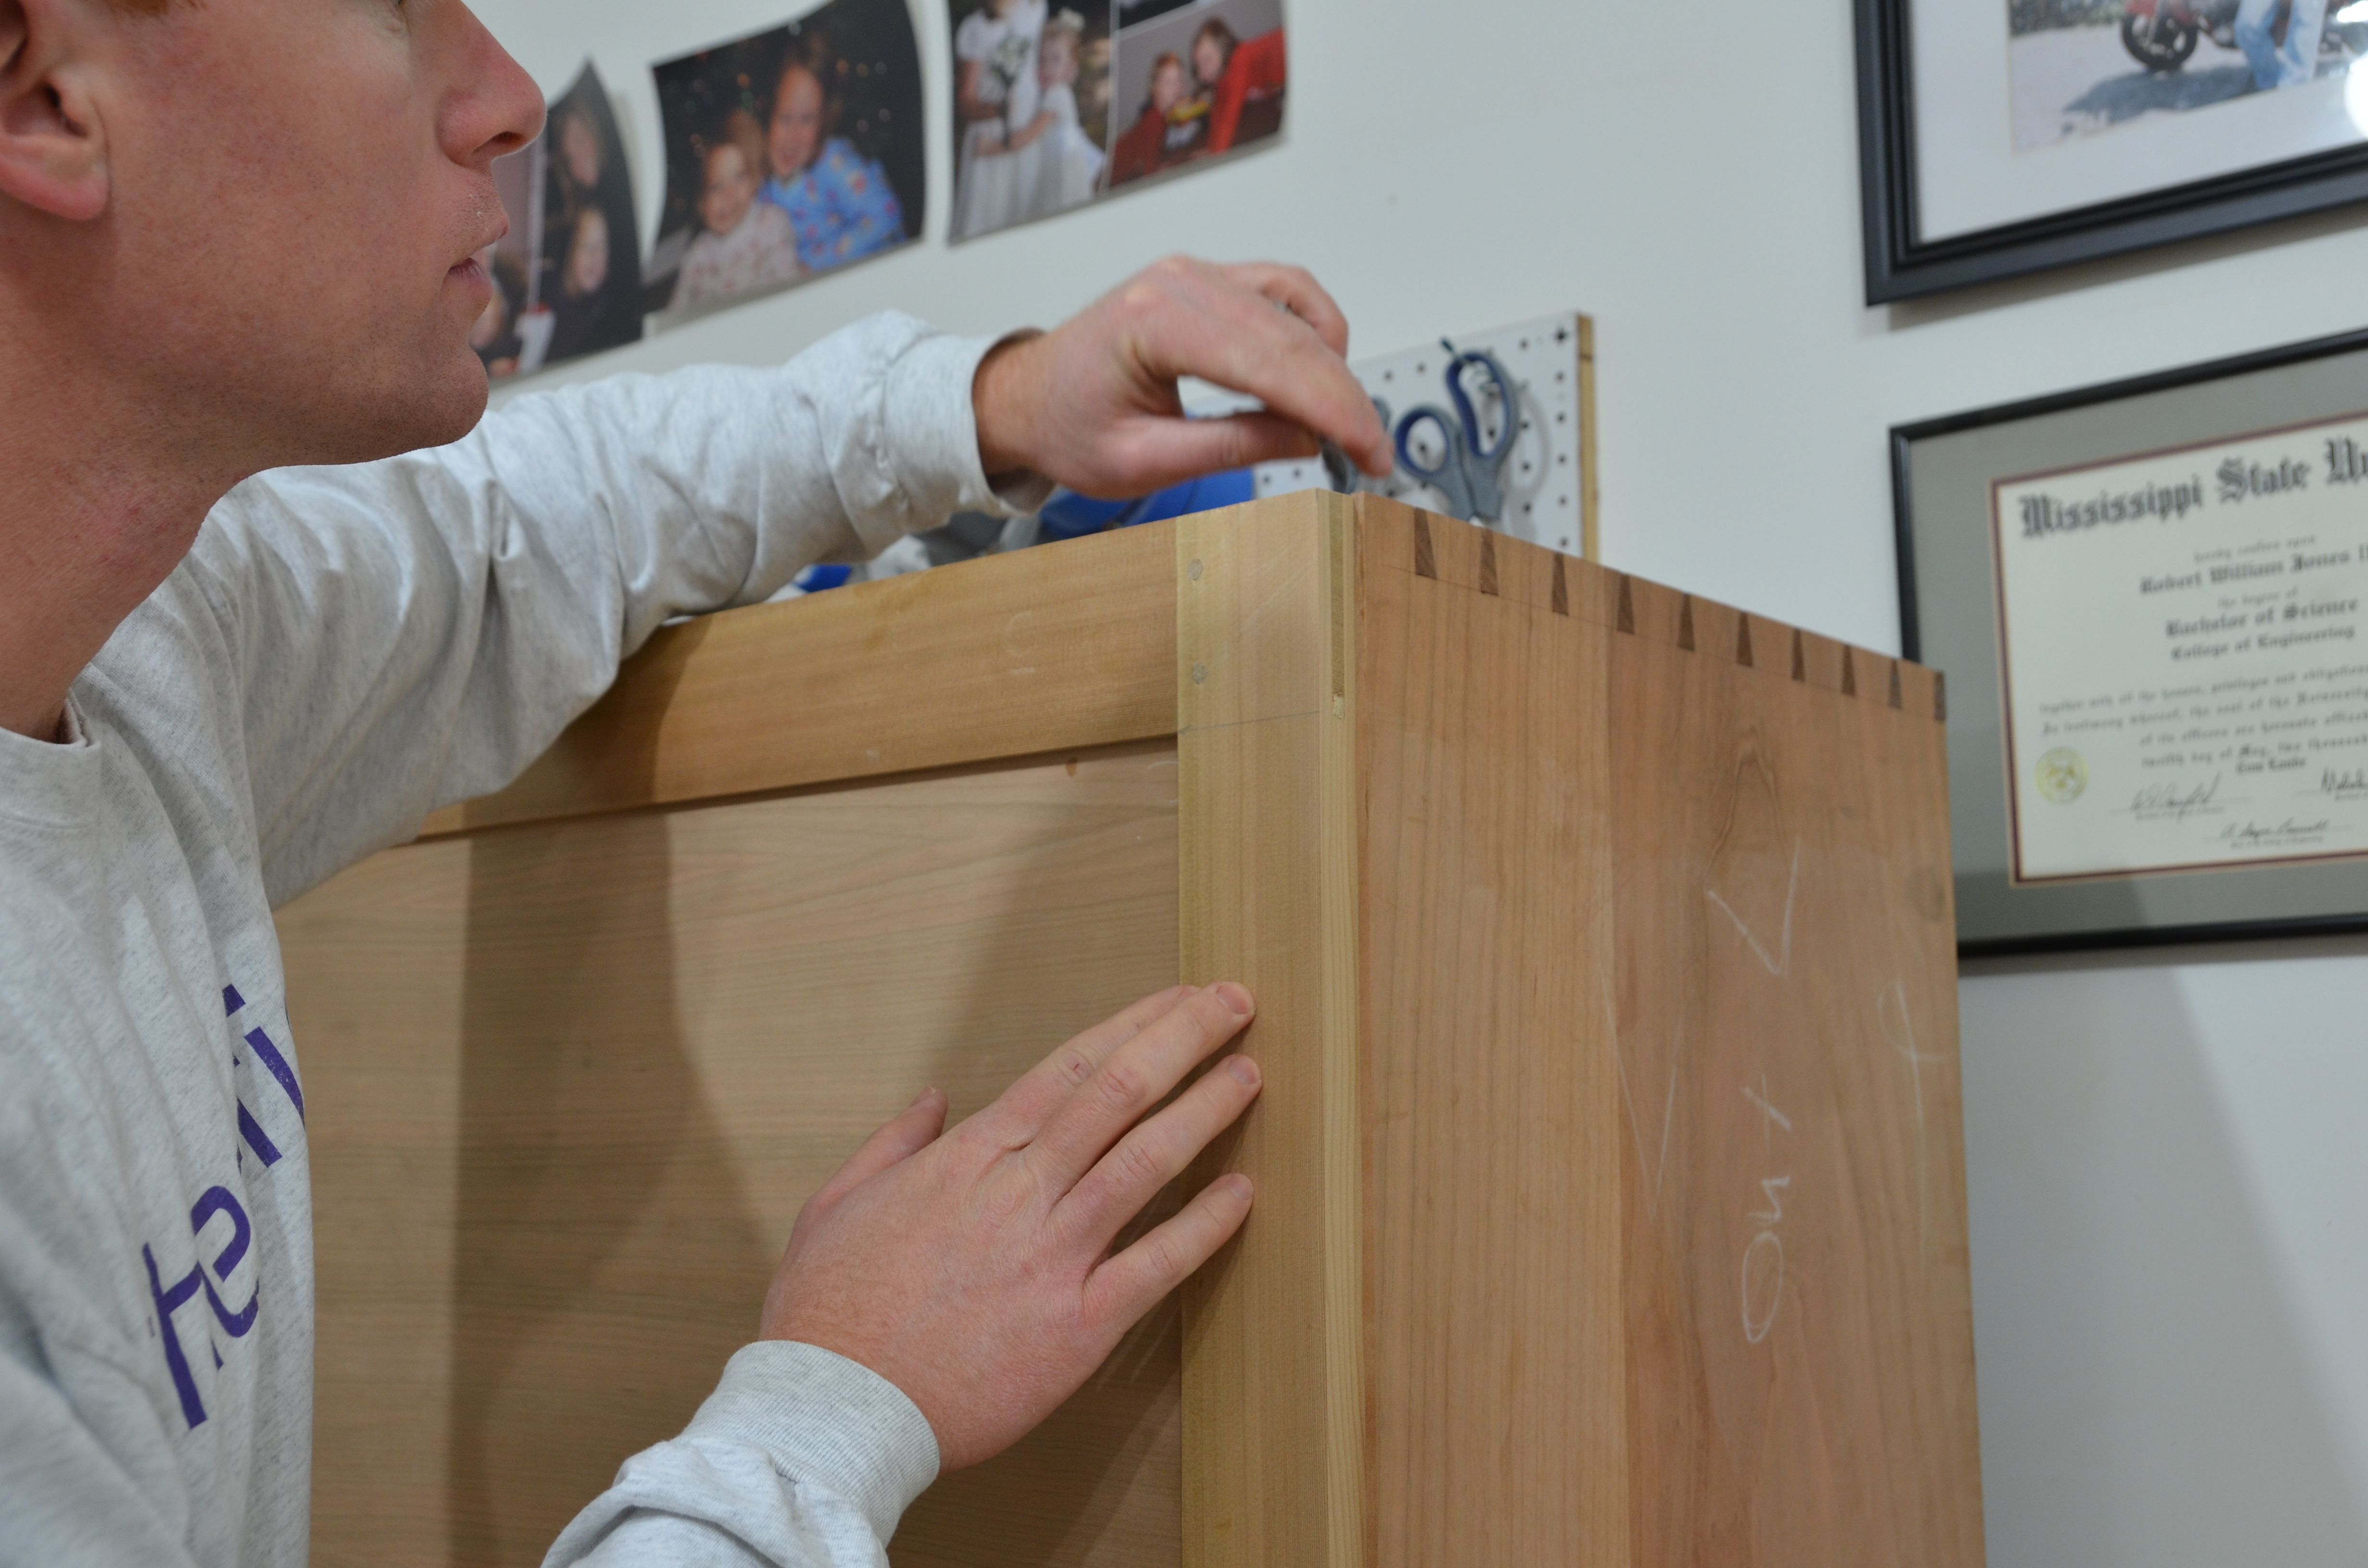
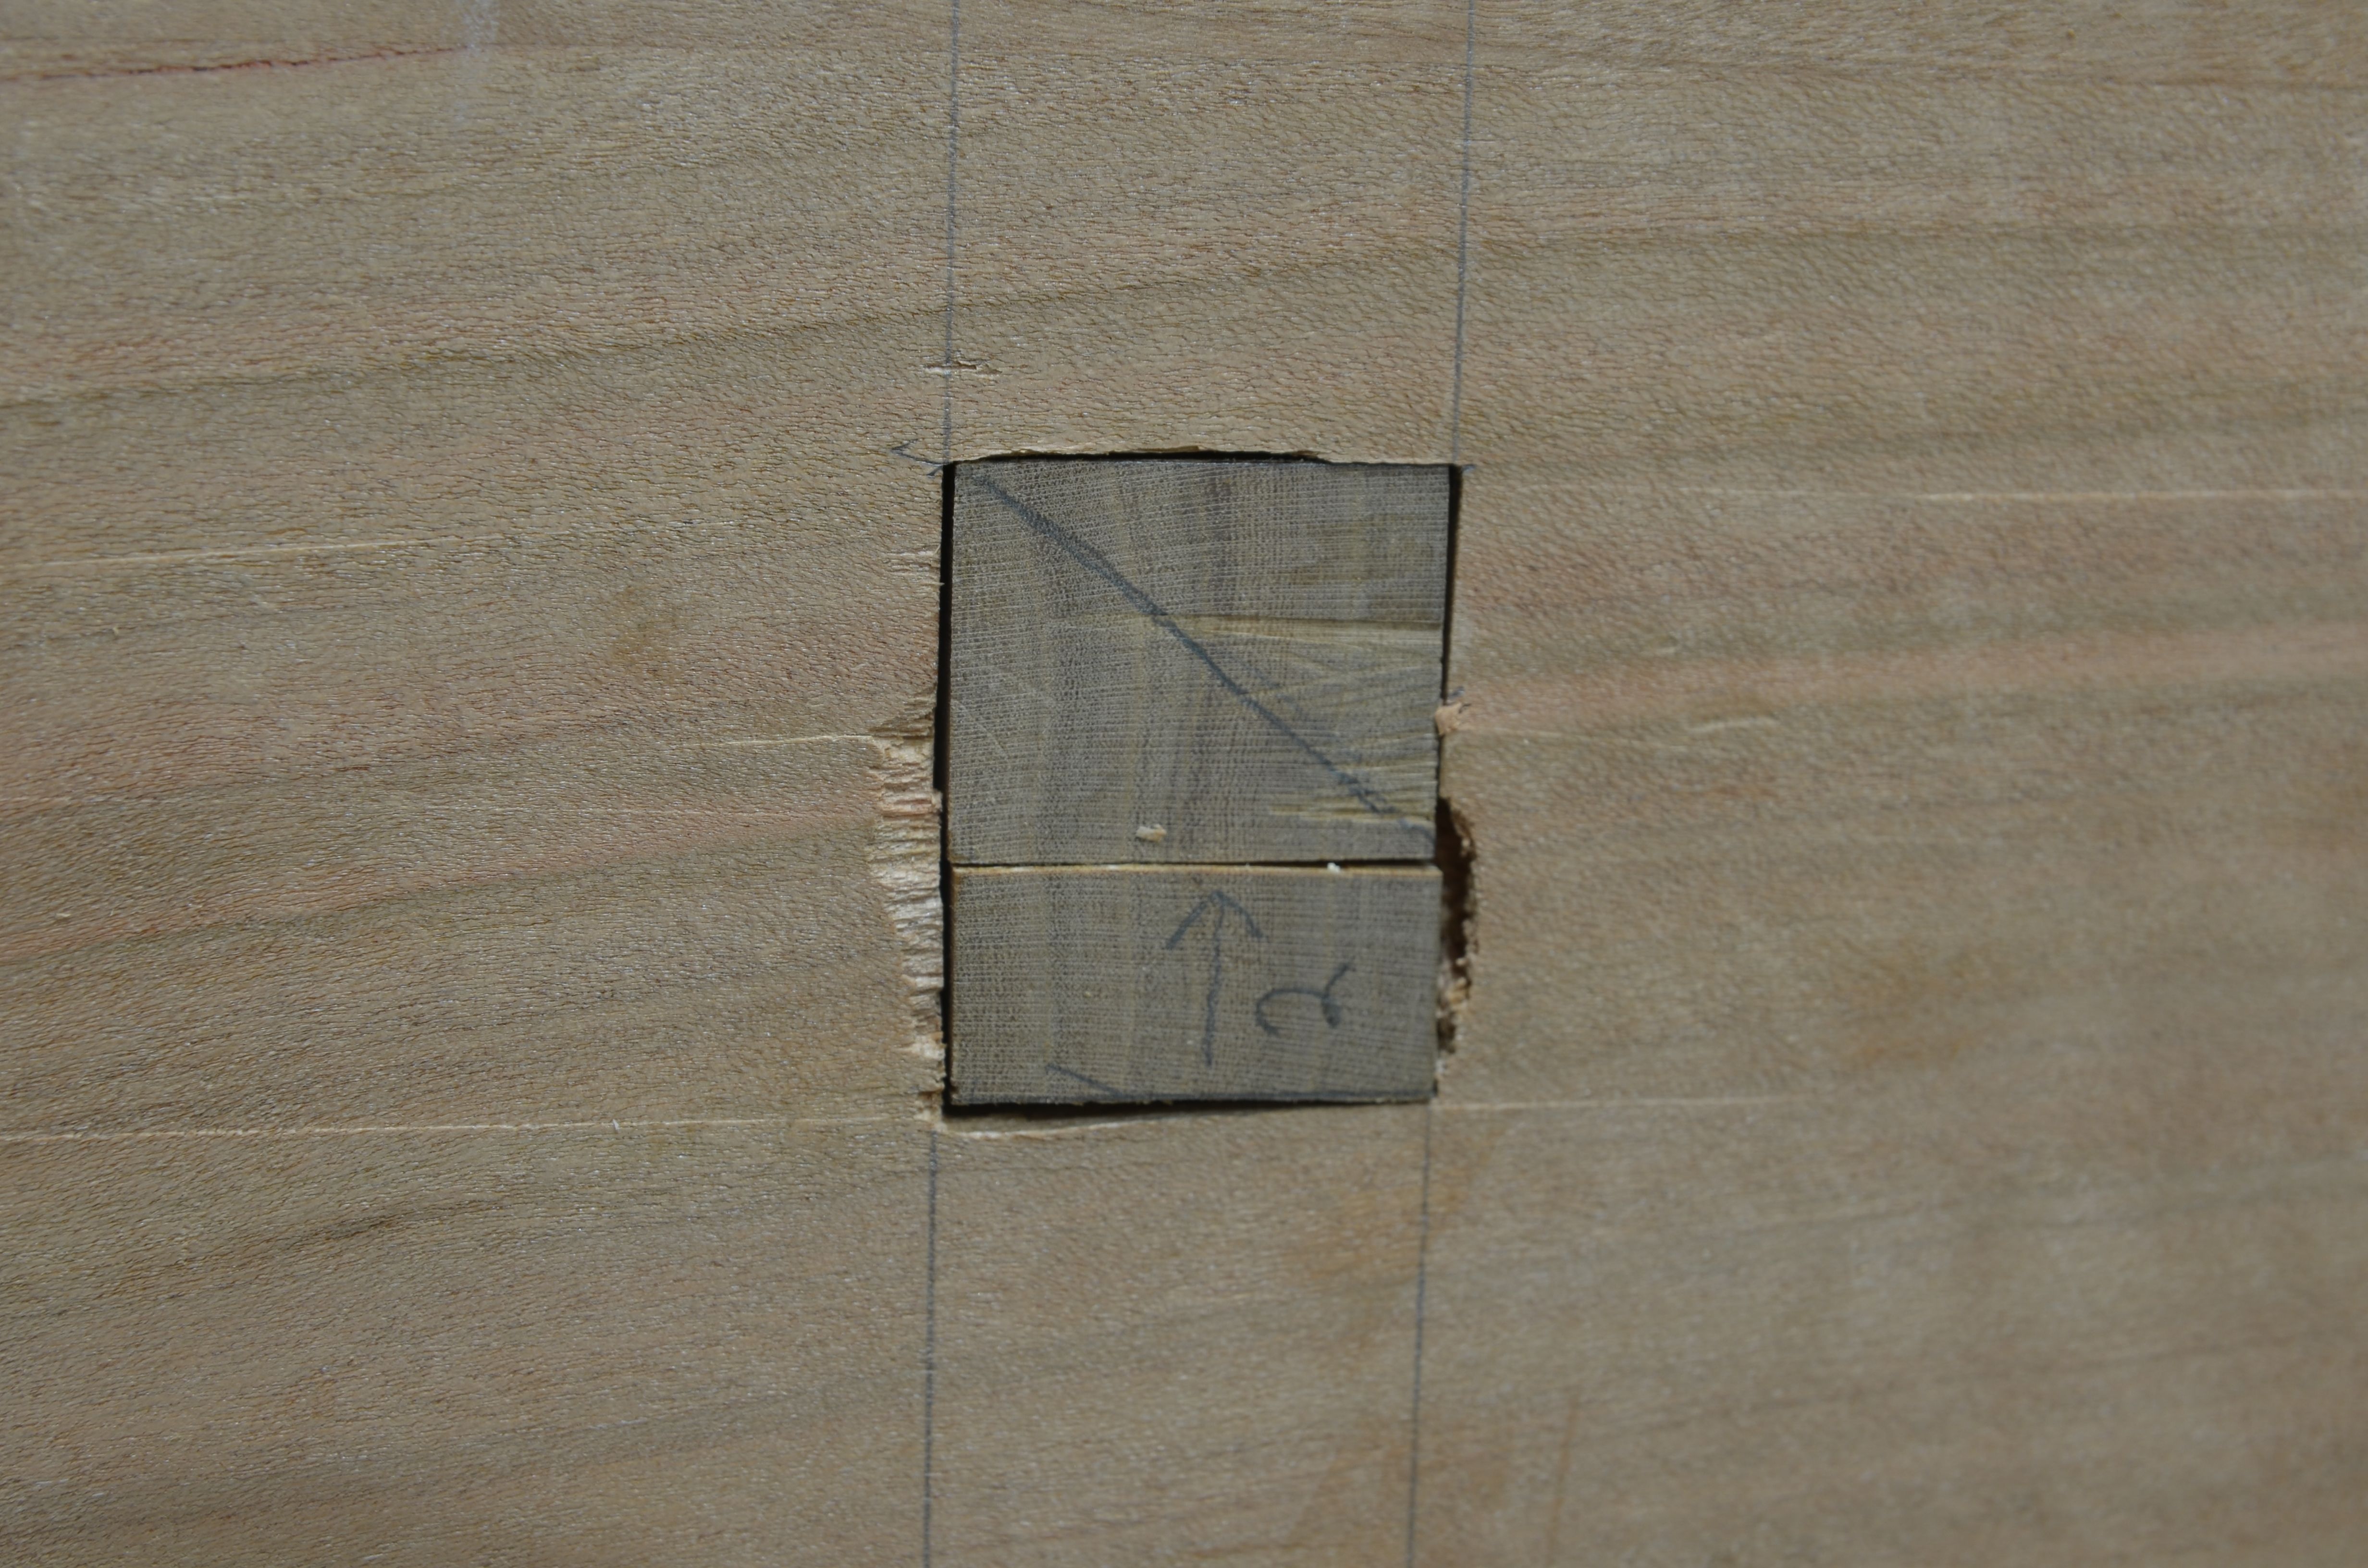
5 – I also fixed a drawer front that was too short.  One word – veneer.  Can you see the thin piece of wood glued to the top of the drawer on the left?  Look closer.  While fitting the drawer front I removed more than planned.

veneer_1

I found a thin strip of color and grain matched cherry in my scrap pile.

veneer_2 veneer_3

I glued the “shop made veneer” on top of the drawer front (yay for blue tape and liquid hide glue).  After a little clean up with a plane it was almost invisible when viewed from the top or front.

rabbet

6 – One more fix.  On one drawer I plowed the groove for the bottom too high (3/4 inch from the bottom rather than 1/2 inch).  That would have been easily fixed by make those slips 1/4 inch taller and the back of the drawer 1/4 inch shorter, right?  Well, I forgot about the back until after the drawer was glued up.  It’s no problem to fix this with hand planes.  I used a rabbet plane to remove that 1/4 inch.  Thankfully the bottom pin was really big so the joinery was not compromised.  This drawer will not be quite as deep as it’s mate, but I bet it will never be noticed.

Finish_2

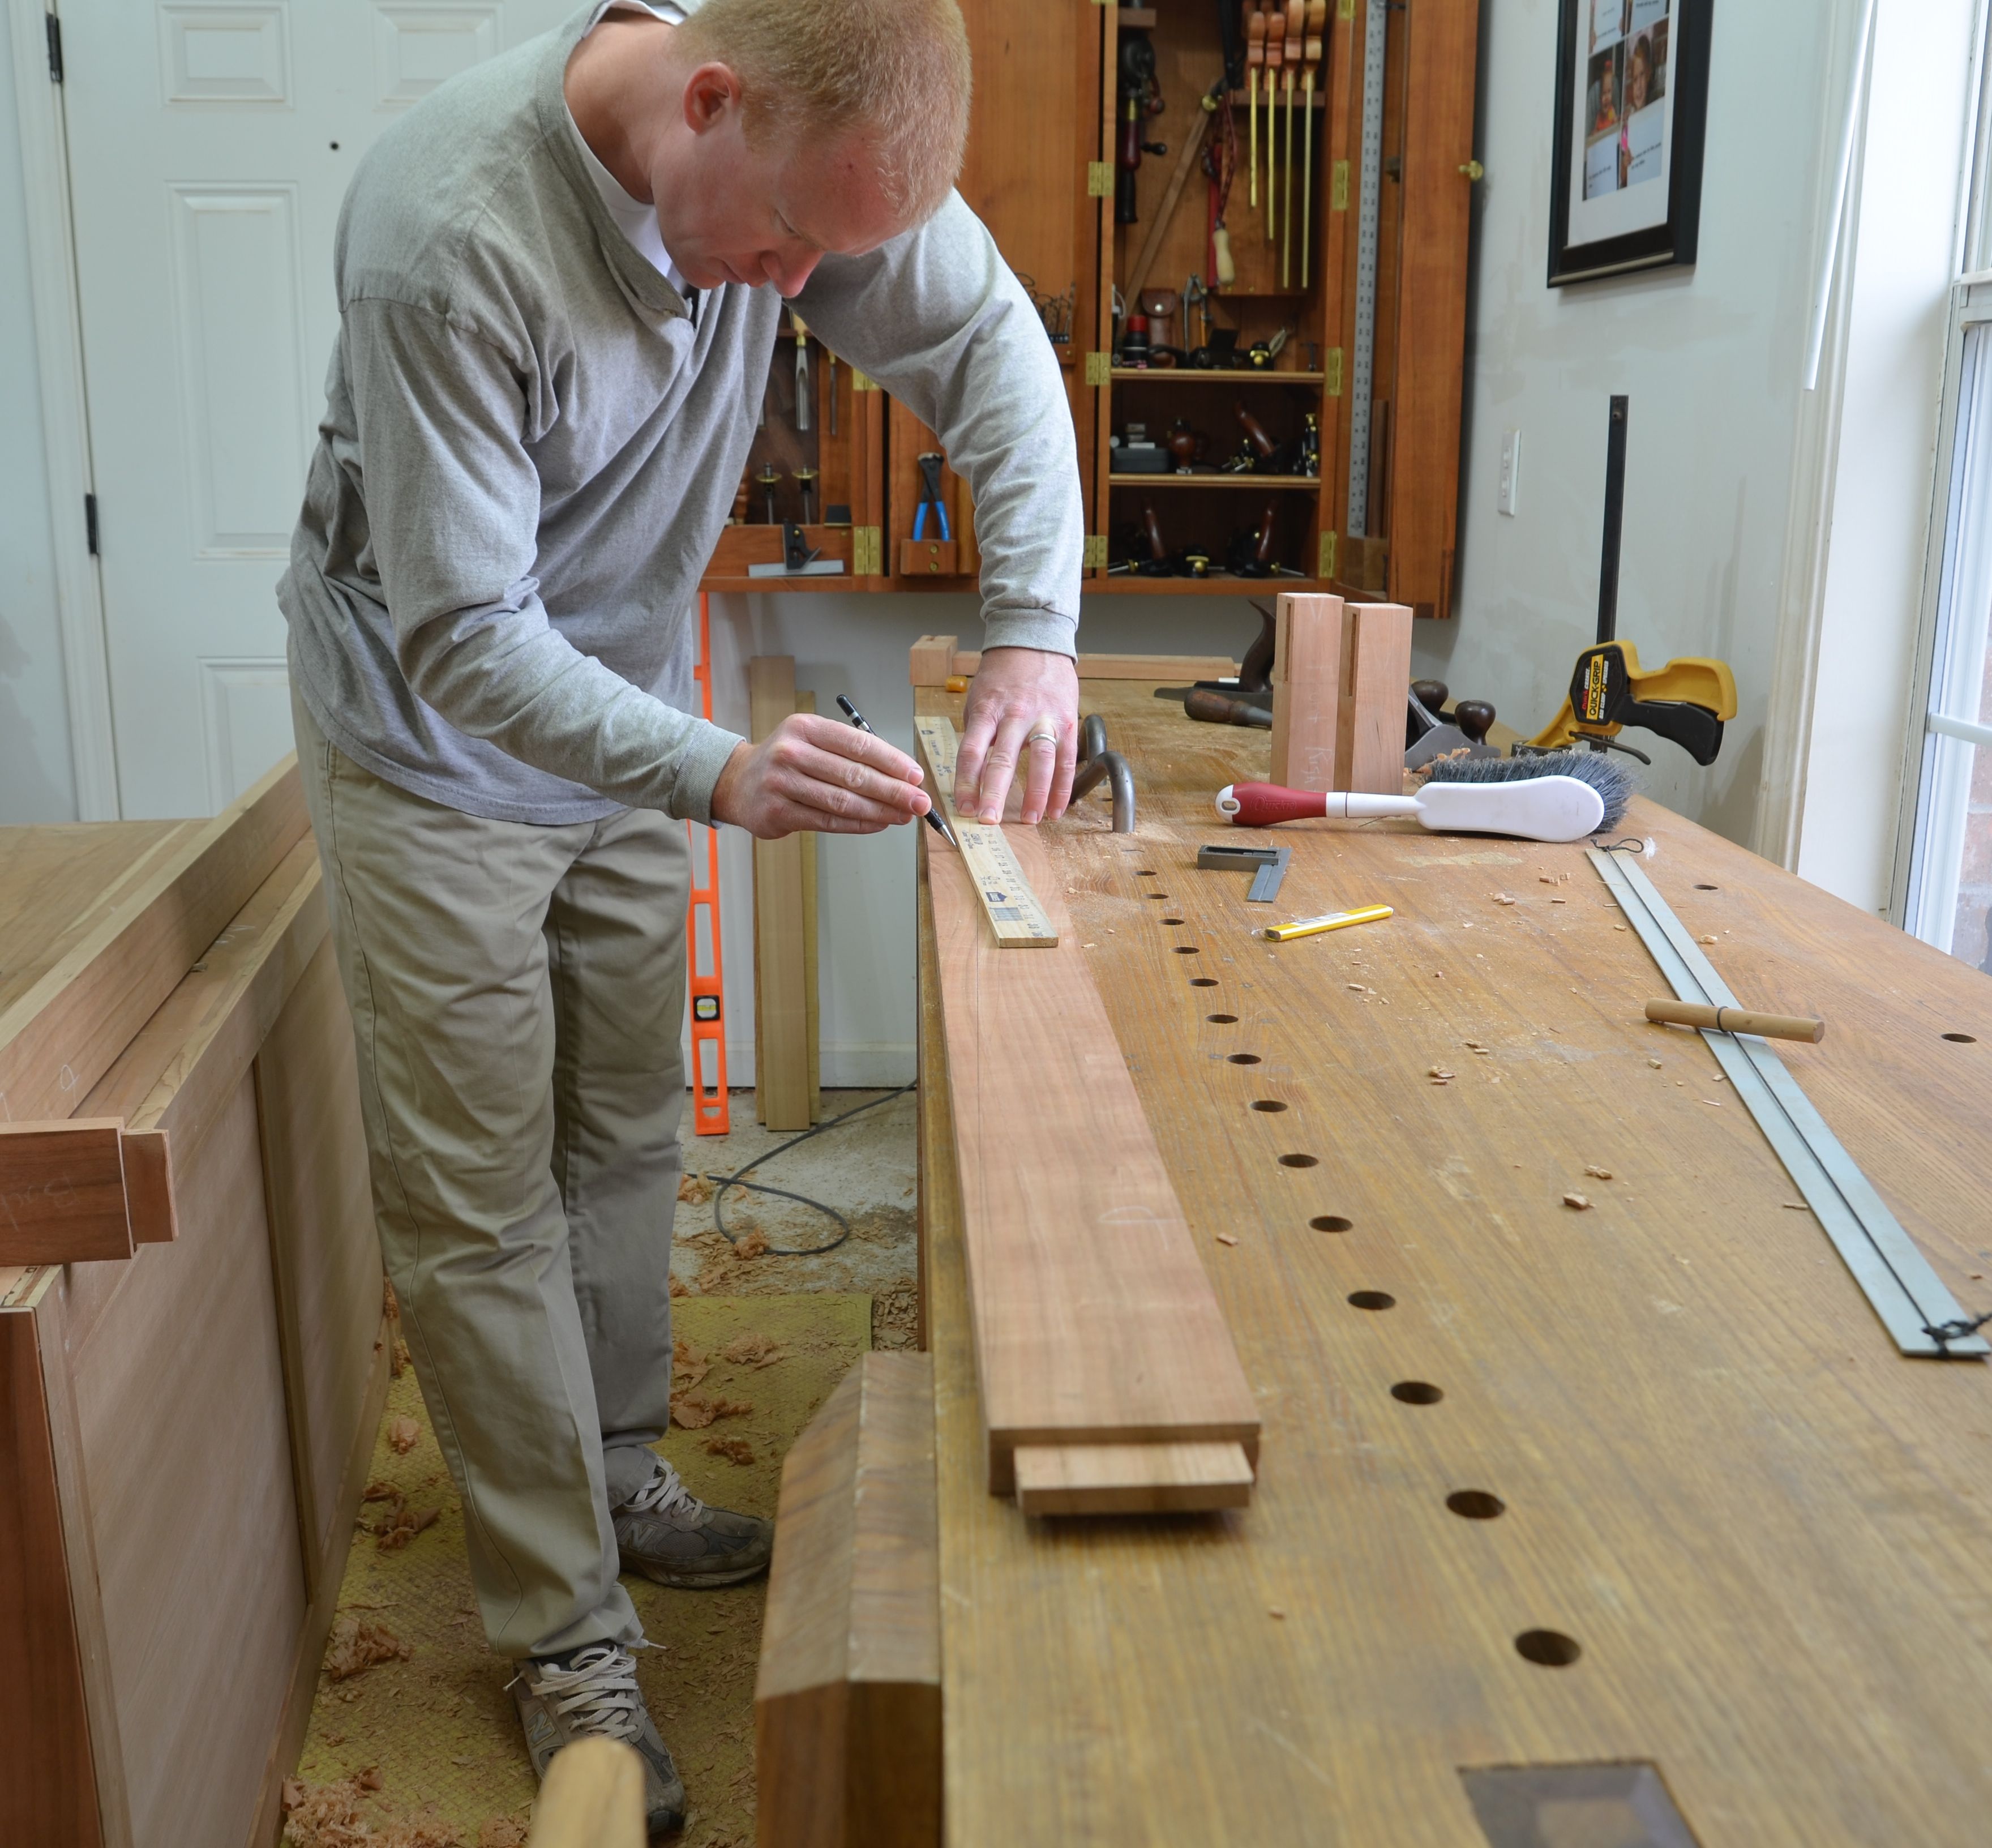
I think I did this 18 inch wide cherry board proper justice (side piece).  It determined the size of the case.

I did get a couple of things right.  The design proportions look good to my eye, the dresser fits in our bedroom, and it holds lots of clothes.  I was also able to make good use of some extra wide, beautiful cherry.  All-in-all, the project turned out great despite the multitude of mistakes.  My wife is happy with the piece and doesn’t know about any of these errors.  Hopefully, I will have the presence of mind to avoid the temptation of pointing out these errors to anyone who compliments the piece.  If you build things, you know how difficult it is to avoid these conversations.

“That is a really nice ____.  Did you make it?”

“Yes. Thanks, but I really messed up the ____.  Can’t you see it there, and here, and there?”

“Oh… yeah, I guess so, but it’s still really nice.  I would love to have one.”

“Thanks, but I really wish I would have taken more care here, and not missed this here…”

Next time, do yourself a favor and stop with “Yes, thanks”.  Your friends really don’t want to hear about these modest mistakes.  They just want to know if you will build them one for free.

Bob Jones

My Favorite Finish

Finish_1

I think the semi-gloss sheen of cured BLO is just right for natural finish, solid wood furniture.  

My favorite finish hasn’t changed in years and that is probably because I haven’t tried many others.  I’m a low risk maker who prefers to stick with a process that has worked for centuries rather than any product that was mixed from unidentified ingredients.  A steady regiment of Boiled Linseed Oil (BLO) and elbow grease is just the ticket.

I’ve already written on this topic, so read that entry first.  In the time since that entry, I have picked up a few additional tips that have given me more consistent results.


fire

Thanks to my father-in-law for battling the blaze.

– Do not throw your oily (wet) rags in a garbage can.  They WILL ignite.  I lost my (plastic) garbage can this way.  It wasn’t even a hot day.  Since that incident, I dispose of my oily rags in a water filled ziplock bag.  

– After applying finish, try to wipe off everything you just applied.  Seriously, use more than one dry cotton rag and try to wipe it all off.  A thick layer of oil will gel and make a tacky surface.  A tacky surface will need to be removed with lots of forceful rubbing of a fine abrasive until the surface is no longer sticky.  Paper grocery bags and abrasive pads work for this salvage procedure but sandpaper is nearly useless because it will clog very quickly.

Finish_2

– Apply 6 coats of oil or more.  Don’t skimp on this just because the surface looks nice after 2 coats.  It will look much better after 6 coats (or more).

– I wipe the whole surface with a rough cotton towel as the first step of applying a new coat and again as the last step after I have dried the new coat.  This process takes a lot of wiping, but it is not tiring because you do not need to use a lot of force, just a lot of motion.

– Do not apply a new coat if you suspect the previous coat is still wet.  If you have the slightest suspicion that the previous coat is uncured, walk away for at least 24 hours.  Coating over a layer that is not fully cured guarantees a tacky finish.

– Expect this process to take a few weeks.  Sure, there are faster finishes that will work for less patient craftsmen, but I built this dresser over the course of a year and I don’t mind if it takes me a month to get the perfect finish.

Finish_3

The dresser, all finished and ready to be filled with clothes.

Finish_4

The dresser adds the next piece to the bedroom suite.  All that’s left is to replace the department store night stands, but I’ve other projects higher on my build list.  Think green woodworking.  

I hope you have enjoyed this build along.  Writing it up has been a lot of work, but fun.  Who knows, by the time I get ready to build another case piece I may need to refer to my own instructions.

Bob Jones

Complete this dresser!

P2-1

These final bits and pieces will become slips and muntins (centers) for the drawers.

In my last post, I mentioned that my drawer sides are only 3/8 inch thick.  It is a traditional English technique that looks great when the drawers are open and makes the drawer lightweight.  You may think that is way too thin for a full sized drawer side, and I suppose it would be if I didn’t add slips.  The slips double the bearing surface of the drawer slide and house the groove that contains the drawer bottom.

P2-2 P2-3

Slips are easy to produce using a plow plane to make the groove (left) and a jack plane to make it the right size and add the user friendly radius to the top inside edge.

P2-3b P2-4

End gain view of a slip (left) and muntin (right).  The muntin is especially useful for wide drawers because the bottom can be made of two smaller pieces.

Charles H. Hayward said that the parts of a drawer that can come into contact with hands should be rounded as a courtesy to the user.  I planed a radius on the corner of the slips and muntins that will be exposed in the final product.  The radius is not controlled, just made about right by hand and eye.  Making this radius with a jack plane is very fast – be aggressive – no fine shavings here.

P2-5 P2-6

Blurry in the background is a wedge that kept the slip groove in-line with the drawer front groove.  Another approach is to form a tenon on the front of the slip.  Either approach is fine.

The slips are glued and clamped (or cramped for Hayward) to the drawer sides.  I hope you can see (on the left) that the slip is a little proud of the drawer side bottom.  After the glue cures, I plane the slip to be flush with the drawer side.  It only takes a couple of passes with the plane.

P2-7 P2-8

I think a small smoothing plane works well for final fitting of drawers.  Remove enough wood so that the drawer slides easily in the case and then remove no more.  A tight fit looks nice.

With the slips in place, it is time for the final fitting of the drawers.  There should not be much to do since each piece was individually fit to the case already.  Holding drawers while planing can be a challenge.  I clamp boards to my bench that hang over the front edge of the bench.  The drawer then rests on those boards without any required clamping.  It is simple and effective.  To plane the front of the drawer, spread the clamp boards out.  Done.

P2-9

The end of this project is now close enough to smell the Boiled Linseed Oil.  It’s all details from here.  

The drawers need a stop so that when they are pushed in they will not go deeper than the front of the case.  In the image above I’m marking the thickness of the drawer front on the bottom of the case.  I’m going to glue a small slip of wood right behind that line.  It’s thin enough that it will not interfere with the drawer bottom, but it will stop the drawer perfectly flush with the case front.  There are other ways to do this, but this method is very simple and easily adjusted with a rabbet plane.

P2-10

Like I said before, radius or at least soften the edges that can contact the hands of the user.  A spokeshave works great on the inside and outside edges of the drawer sides.

P2-11

With the drawers complete and fitted, I went back to work on the top.  Here I am planing the sub-top because it needed a little flattening.  It didn’t come out as flat as I would have liked, but I made up the difference on the underside of the top.  Remember, when working with hand tools every piece of wood need not be straight/flat/level, they only need to fit nicely and look straight/flat/level.

P2-12

Here I’m finally fitting and trimming the real top.  That overhang will be sawn off and cleaned up with a sharp smoothing plane.  I’ve come a long way from the land of 10,000 decisions.  Next stop, finishing.  I’m too excited to sleep.

Bob Jones

I got it one piece at a time

But I sure hope it turns out better than the Pshyco Billy Cadillac. P1-1

Most of the pieces needed for the 6 drawers of my dresser. I’m working on the drawers of my eternal dresser project.  This is the point where I’m either going to finish this or burn it for heat.  The drawers are made up of 9 pieces each x 6 drawers = 54 pieces!  That may not seem like a lot to someone who is feeding pieces of wood through a drum sander and router jig, but when you are working each piece to size with planes and joining them with saws and chisels, it takes a while. The best description that I have read on making drawers was written by the excellent Charles Hayward in Cabinet Making for Beginners.  He covered the topic so well that any further writing is unnecessary.  However, since that book is long out of print, I will hit some of the highlights.

P1-2 P1-3

Get all of the pieces to rough size.  This means making boards 1 inch or more too long and 1/8 inch or more too wide.  Why oversize?  Because every piece needs to be perfectly fit in it’s place in the case.  If you can do this with your tablesaw, feel free.  Here I marked the final size of each piece in it’s place, then continued the mark with my panel gage.

P1-4 P1-5

I final fit each piece with a hand plane and I check the fit often.  Accurately sizing each piece makes fitting the assembled drawers fast and accurate.  During this final fitting I make adjustments for any out-of-squareness of the case (especially drawer openings).  I generally fit the width (height) of each board, then mark the length (on right).

P1-6

I fit the drawer fronts following the same steps as with the sides.  Remember, my drawer openings are not perfectly square, so the drawers fit the opening.  If anyone studies my dresser with an engineers square, I’ll kick them out of my house. Drawer sides are best made from quarter sawn materials.  Unless you want to use white oak or cherry, QS material is really not available.  For this dresser and my chest of drawers, I made my own QS stock.  To do this, I bought a really wide cypress board that was cut near the pith (center) of the tree.  I cut it into drawer sides (length and width) and resawed 2 sides.  It worked pretty well since the sides need to be 3/8 inch thick and the original board was 5/4 (1.25 inches) thick. Once all 4 pieces of a drawer are fitted to the case, plow a groove at the bottom (inside) of the front.  Not actually on the bottom, go at least 1/4 inch up.  I made mine 1/2 inch from the bottom because these drawers are really deep and that makes it easier to hide the groove within the (dove)tails on the front.  Speaking of, I will not cover dovetailing the drawer, except two points.

P1-8

1 – The back is shorter than the other pieces, to allow the drawer bottom to slide in place.  It is level with the top of the drawer. Remember this when laying out the drawer.

P1-7

2 – Before you dovetail these parts that you have milled perfectly, PRACTICE on scrap!  Here is my first practice joint.  See any problems?  I practiced on 2 more to brush up on my technique before sawing my real parts.  

P1-9

With the 4 corners dovetailed, it’s time for glue-up.  I clamped my front board to the workbench and that seemed to help the process.  I liked the benefit of the thin sections of the front being supported while I hammered the sides into place.

P1-10 P1-11

Check the glued-up drawer for square.  Check the length of the diagonals (right) and flatness (left).  Apply pressure to perfect the form.  Careful now.  Once it is square and flat, leave it alone for the next +8 hours. Phew! With all the drawers joined together it’s time to make the final bits and pieces, but that will wait for the next chapter.

Bob Jones

Thank you, Pinterest

Hook_shelf_1

Thank you, Pinterest, for a constant flood of ideas for cute-sy type projects that the softer side of my household enjoys.  Original design is not a strength for my lovely wife, but she knows what she likes when she sees it and that is where the power of Pinterest shines through. Lindsay regularly shows me pictures of home decor ideas and says, “I really like this, would you build it for me?”  Unfortunately I am compelled to decline most of the time because the projects she finds would either cost too much or just wouldn’t fit in our regular sized house (a high percentage of Pinterest pictures come from Southern Living caliber houses).  But every once in a while she finds something and I get to say, “Yeah, I will do that for you.”

Hook_Shelf_2

Pop projects (from Pinterest or other sites) don’t interest me.  I like to spend my limited shop time building solid wood furniture that needs no stain or paint.  It’s not everyone’s cup of tea, but I’m not building things for everyone. I build things for me.  I expect furniture (or other decor) to be durable, timeless, well proportioned, functional – you get the idea.  Lindsay just likes things that look nice and make her life more comfortable, like most Pinterest followers, I suspect.

I didn’t photograph a proper build-along with the hook shelf, but here is a little guidance for construction.

 Hook_Shelf_3

Drafting with thin sections of wood and a sharp chisel is more fun than pencil and paper.

I based the proportions for this shelf on hooks that I bought from my friends at the woodwork shop.  You can order them from Rockler.  Because I can not cut my own complex molding (yet), I picked up a piece of crown molding from the home center that I figured was about the size that would look right.  I then sawed a few thin sections of wood and played with the pieces to get the dimensions that looked about right (no drafting on this project).

The joinery is not pictured.  I planed a shallow rabbet on the bottom back edge of the shelf to fit the back.  This rabbet makes assembly an easy job – try nailing two boards together like this by yourself and you will see the purpose of the rabbet.  I then nailed the crown molding in place, caulked the joints, and painted with regular household trim paint.  After the paint cured I screwed the hooks in place and hung it on the wall using these neat hangers.  I think the end result looks nice.

Hook_shelf_4   Hook_Shelf_5

I added a detail of hand planed moulding at the bottom and top edges of the shelf board.  I did this loosely based on the instructions in Matt Bickford’s excellent book on the topic.  It’s a great read even for those of us who don’t currently own moulding planes.  The best part is that rounds like this can be made with just a rabbet plane and a little patience.  Notice the facets that are apparent only if you look closely.  That is the sign of making a round surface from a straight edge tool.

Even though Pinterest has a very girly feel, I will confess to visiting the site more than once.  It is a powerful search engine that produces a visual flood of images that are often more relevant than a Google image search.  I dare you to search for something related to furniture building or woodworking.  Search specific terms and you may be surprised at the quality of search results delivered.  Warning – Before browsing, make sure no guys are looking over your shoulder when searching there – they may revoke your man privileges.

Bob Jones

A stable foundation for the Dresser (Part 2)

base_example

It is hard to tell in this picture, but the rails of the base are flush with the sides and front of the (previously built) cabinet.

The most difficult operation in building the base is getting the rails to the correct length.  The rails of the base are supposed to be flush with the case on all 4 sides.  Note to self – Next time use some under or over hang because getting components “flush” is tough.  I sized mine by marking the components in place on the case, but I think there should have been an easier way.

With solid wood construction wood movement must always be considered.  In this instance, the sides of the dresser will expand/contract with the seasons, but the base will not.  If you don’t understand wood movement, here is a great book on the topic.  This movement is allowed by using “buttons” to connect the base to the case.  These are handy little things that screw to the bottom of the case and fit into hidden mortises in the rails.  They are sized such that they clamp the base to the case.  Again, Robert Wearing described these very nicely.  By making the mortises in the side rails larger than the buttons, movement is allowed and the case will last for many years.

I made my buttons from a short, but wide board.

P2-01-Buttons_1 P2-02-Buttons_2

A rabbet plane forms the tongue of the buttons.  After flipping the board, I marked out each button in the row, and drilled the holes for screws.  I used a counterbore for the Lee Valley cup washers that I like so much.  After this step the buttons were freed from the board.

P2-03-Buttons_3

I asked my shop assistant to carefully stack as many buttons as possible.  Careful now…

P2-04-Buttons_4

How many buttons does it take to connect a case and base?  I don’t really know.  Robert Wearing said that it was better to have too many than too few, but I probably went overboard.

All of those buttons needed a home, so out came the mortise chisel again.  With all the practice making full sized mortises, these little ones were fast and easy.  The mortises on the side rails were chopped a little wider than the buttons to allow wood movement.

I chose to form a very large arch on the front rail as the only real decoration in the whole dresser.  It matches the style of the bed and chest of drawers I previously made.

P2-05-Arch-1 P2-07-Arch-3

Drawing this arch was a real challenge.  I tried to use my trammel set, but I needed an arch with a radius of more than 9 feet, so trammels were no match.    I decided to make due with a straight edge and bowed yardstick.  I knew the location of 3 points – the middle and both edges – so I connected the dots with my straightedge.  Then I added a curved line with a bowed straightedge.

P2-08-Arch-4 P2-06-Arch-2

It took a few attempts and free hand work.  More than once I needed to erase my progress and start over.

P2-09-Arch-5

I eventually gave up on the pencil work and finished “drawing” the arch with a saw and rasp.  I’m a big fan of my Gramercy hand cut rasp (10 inch 16 tpi).  Yes, it is expensive.  Yes, I would buy it again.  There is no need to use a spokeshave here because the rasp leaves a surface that is nice enough considering it will never be seen.

P2-10-Glueup-1 P2-11-Glueup-2

Time to get ready for glue-up.

Because the legs are 1/8 inch outset from the case, I chose to finish plane the rails prior to assembly.  I then used tape to make it easy to clean glue squeeze out.  Blue tape works great for protecting the show surfaces.  I glued up the base while it was positioned on top of the case because the main thing is sameness – not squareness.  What do I mean?  If the case and base match, then a small amount out of square will never be noticed.  If, however, the base is perfectly square and the case is not – something is going to look ugly.  With the base in place on the case I adjusted the base to fit the case (feel the rhythm, feel the rhyme).

P2-14-Glueup-5

Clamps are awkward in a glue-up like this.  I use corner spacers (big dowels) and rope.  Pressure is applied by twisting a long stick to get the rope tight.

P2-12-Glueup-3 P2-13-Glueup-4

Once the glue cured, the base was removed and I finish planed the case.  All visible case surfaces were finish planed.  I find the front to be most difficult because of the perpendicular grain directions of the dividers.  Skewing the plane helps to narrow the effective width of the blade.  Work slowly and carefully.  This needs to be done now because planing will not be possible later due to the legs being proud of (sticking out from) the case.

P2-15-Cleanup-1 P2-16-Cleanup-2

Finish plane the legs of the base, too.  This means leveling up the top of the legs and rails and finish planing the show surfaces of the legs.  Use clamps, battons, or stops as needed.

P2-17-Cleanup-3

I don’t care for block planes.  I find bench planes easier to hold.  Here I am softening the corners of the legs with a small bench plane.  I forget what size it was, because that doesn’t matter.

P2-18-Cleanup-4

Just a little more wood to remove.  I added a chamfer to the bottom and top of the legs.   Here I am marking the chamfer out all the way around the bottom of the leg.

P2-19-Cleanup-5 P2-20-Cleanup-6

Making a short chamfer is easy work with a wide and sharp chisel – easier than with a block plane for sure.  Keep your hands in contact with the leg to increase control.  See the curly shaving?  That is a sign of a sharp chisel that is in control.  The resulting chamfer is clean and sharp.

P2-21-Assemble-1 P2-22-Assemble-2

I put the base back on the case and marked the screw hole locations for the buttons.  I think everyone knows this technique for hole location marking, but I’ll repeat for good measure.  Put the button in place, insert a drill bit through the screw hole, tap the bit with a hammer, expand the indention with an awl (if you choose).  Hole located.

P2-23-Helpers

That’s all folks!

It is finally time to install the base.  Sorry, no picture of the assembly because I could not get a good photo of this big piece in my small shop.  I’ll work that out before the next installment.

Bob Jones

A stable foundation for the Dresser (Part 1)

The process of constructing the base I’m building now is very well described of one of my favorite woodworking books, “The Essential Woodworker” by Robert Wearing. His book makes any additional writing completely unnecessary and redundant so I should stop this post right here, but because that pivotal text has not stopped the 1,000’s of books and articles on the topic since it was published, it will not stop this blog entry either.

base_example

My previous project – the base of the dresser will hopefully look like this.

The base will have 8 pieces in total; 4 legs and 4 rails.  The components will be joined by mortise and tenon, which is a fun joint to make with chisels and saws.  I don’t understand the barrage of products available to make a square hole in a piece of wood.  Making a mortise with a good chisel is fun and “easy” with good technique and a little practice.  I’ve gotten ahead of myself – let’s go back to the start.

The legs are about 2 inches square.  I laminated the legs from 1 inch thick stuff because I wanted all the visible wood to come from the same tree and I didn’t have any thicker stock.  Laminating pieces this small is not very fun with planes.  I did my best to get the laminated surfaces dead flat such that the two pieces do not rock when stacked together.  I took extra effort to arrange the pieces in a way that the grain flows like a solid piece.

Work the legs and rails to the right sizes.  Leave about an inch of waste on the top of the legs to be sawn away after the mortises are chopped.  I sawed tenons first and then chopped the mating mortises, but I don’t think the order in M&T stirs nearly the controversy as Tails or Pins first dovetails, so pick your pleasure.    Here are a few pictures of the process.

Base_Tenon_1

Mark out the tenons however you like.  I use my Veritas wheel gauge with the mortise wheels, plus a 6 inch square with a knife to mark the shoulders.  Notice one shoulder (the inside) is thin.  This is perfectly ok.  You really do not need an inside shoulder at all.  The important distances are the outside shoulder depth (which controls the rail offset from the leg) and the tenon thickness.  This technique saves time because all of the rails need not be the same thickness.

Base_Tenon_2

Here I am preparing for a “second class saw cut” (according to Robert Wearing) by notching the lead in corner with a chisel to give the saw an accurate place to start working.  You may also notice the kerfs for the tenon shoulders – I like to crosscut my tenon shoulders first.

Base_Tenon_3

For the tenon cheeks – saw the diagonal corner – then flip and repeat from the other diagonal – then finish straight across the tenon like I am here.  Remember to saw on the WASTE side of the line.

Base_Tenon_4 Base_Tenon_5

I lopped off the ends of the tenon with a chisel – it’s faster than rip sawing and more fun.  One well placed blow takes care of 90% of the waste, then I remove the last 10% with more caution.

Next I make a square hole with a chisel.  I think body positioning helps with accuracy, but I don’t recall reading this anywhere else.  Rather than flinging your arms around, try manipulating the chisel with your whole body.  I think it helps keep things straight.

Base_Mortise_1

Use hand pressure to push the mortise chisel just into the wood to define the mortise.

Base_Mortise_2

I’m sighting down the edge of the workbench and the chisel to keep the chisel and hole vertical.

Don’t be scared to smack the chisel.  Old pictures (really old) show joiners standing straight up and holding a mallet over their heads.  If that is really what they did then they made an impact!

I use the “down and back” mortise technique.  I start at one end and remove very little in the first plunge.  I go down the length of the mortice and the depth at the same time.  By the time I am to the far end, I am also at the full depth.  I then work my way back the the end where I began.

Base_Mortise_3  Base_Mortise_4

Clear the waste after every plunge.  The “right” way to do this is lever the waste forward (into a void) and then pull back on the chisel to lever the chip(s) out.  Notice how my whole body is moving forward and back.  I’m not pushing very hard, but I think this helps keep the chisel straight compared to just moving my arms.

Base_Mortise_5

The more mortises I chop, the more aggressive I get.  Here is a shot of the waste that was removed in a typical plunge.

Base_Tenon_6  Base_Tenon_7

I trial fit each M&T separately.  If the joint is too tight, the easy thing to do is thin the tenon with a router plane.  Notice I’m using downward pressure over the rail – not the side where it is unsupported.  After the tenon fit to my satisfaction, I chiseled a small chamfer around the tenon edges.  You should be able to do this by hand (no block plane required).  If you can not do this by hand then sharpen your chisel and practice!  This skill will make things easier later – but you’ll have to wait ’til my next post to understand that.

Bob Jones

A back for a not-so-square case

Back_1

In an earlier post I admitted that my dresser case was not square when the glue dried.  I’m not exactly sure how out it is because I get different numbers when I measure different ways, but it’s out of square between 1/4 and 1/8 inch over the diagonal.  At this point I could have built a back that is also out of square, but I thought that would be too difficult.  Imagine building with angles of 90.5 deg.  Silliness.  Instead, I decided to build an oversized frame and panel back that could be planed to fit.

Back_2

For a frame and panel back, it is nice to use quartersawn stock for the frame.  It is easy to make narrow quartersawn stock, all you need is thick, flatsawn material.  Here I am flattening one side of a cedar 4×4 post.  Once I have two flat and perpendicular sides, I run it through my bandsaw to get 3/4 inch thick quartersawn stock.  It is quick work with a bandsaw.

Back_3 Back_4

Once I had my frame stock cut to the correct lengths, I started the joinery.  First I plowed grooves, just like the rails and runners.  Then I used my bandsaw to cut the open mortise and tenon joints at the corners of the frame.  I decided to drawbore the corners so that clamps would not be required to glue the frame.  Drill the hole in the mortised board first, then use it to mark the spot on the matching tenon.  Notice that I had some scrap wood in the mortise to prevent blow-out of the grain inside the mortice.  Usually, the hole in the tenon is offset toward the shoulder of the tenon board, but this one is offset in two directions and I found it really helpful to keep Woodwork Joints (Charles Hayward) in my off hand for reference.  FYI – That book never leaves my shop.  

Back_5

With all of the components cut to size and all the joinery trial fitted, I laid everything out for glueup.  You can see my panels are 1/4 inch ply which saves time, materials, and weight (compared to solid wood panels).

Back_6

This is why I should have used one pin per joint.  I thought that one pin did not look like enough holding power.  Silly me, I should have known to trust Mr. Hayward without question.

Back_8

After the back was assembled, I fit the back panel in place.  I made the back 1/2 inch longer than the dresser.  I did this because I wanted to be able to trim some off each side to fit the square back into the non-square hole.  I expected to remove material from the bottom left and top right of the edges – and that is exactly what was needed.  I put the back in place and marked the corners where wood needed to be removed.  I fit the left side first, then the right.

Back_7

Removing wood from the end of a panel or long board requires creativity.  Here I clamped the back panel to the front of my bench and stood on my sawbench.  I have stood on my benchtop when needed.  Fit one side at a time.

Back_9

Keep checking and planing until you get a nice (somewhat) snug fit between the rebates on the sides.  Why a snug fit?  Because the back will be glued in place.  In case you think that would be a problem for wood movement, I did my research first.  I found an article in a Fine Woodworking Magazine article written by Christian Becksvoort.  He built a dresser with similar joinery and he glued on a frame and panel back.  Since he literally wrote the book on wood movement, I figured it was ok to glue it.

Back_10

Once I was happy with the fit of the back panel in the case I cleaned up that damage I showed earlier and flattened out a few rough spots.  It is the back, so I didn’t got over the top with smoothing.  Next I glued the back in the case and moved my attention to the base, but that will be the subject of another post.

Bob Jones

Dresser – Rails and Runners

Slow and shaky work continues on the dresser.  Here are some highlights from the next stage of the build – fitting the internal parts (rails and runners).

Drawer_runner-1

Here is the goal for this step; a nicely fitted rail into the case side.  How do you get here?  It starts with a saw.

Drawer_runner-2 Drawer_runner-3

By now you should know how to size boards and prep them for joinery (4 square).  Saw one end of your rail square and “shoot” it to perfection, if you like.  I like my Lee Valley Bevel Up Jack Plane for this purpose.  That is about the only time I use this plane, because I generally prefer bevel down.

Drawer_runner-4

Using the end of the rail that you just made square, trial fit the rail into the dado.  Don’t expect all of the dados to be the same size, because they were cut by hand. Fit each rail into it’s home (dado) and keep up with the correct location and orientation of each piece.

Drawer_runner-7

If the rail is too thick to fit, I use a fine set plane to knock the end off until it fits.  Use this method if you are off less than 1/16 inch; if you are off more than that, consider sawing something (the board or the dado).  To me, this is easier than opening up the dado.

Drawer_runner-5 Drawer_runner-6

Once the first end fits into it’s dado, slide it in and mark the correct length of the rail on the other end.  Notice I’m marking the end from inside the case. That makes line #1 in the picture above.  I don’t saw to that line, because that is too risky.  I make the rail a little longer and saw to that length (line 2).  I then “shoot” the rail to the perfect length, checking the fit every few passes.  The shooting plane allows very fine adjustments, which makes it easier to get a perfect (fingers crossed) fit.

Drawer_runner-8

Plowing a groove in a runner to accept a dust panel.  The panel is optional, but it’s a nice touch.

Behind the rails go the runners.  Those are the pieces that “run” from the front to back of the case and are the slides for the drawers.  My runners are quarter-sawn white oak.  There is no need to buy QS stock; I bought a flat-sawn 8/4 (2 inch thick) board and made my own QS runners with my bandsaw.

Fit the runners into the dados by the same process as the rails.  Remember to leave the runners long enough to have a tenon on each end that will go into a shallow mortise in the front and back rails.

Drawer_runner-9

Sawing the shoulders for the tenon on a rail.

Feeling lucky?  Here is a fun way to make tenons for the runners.  When the tenon is relatively short and the board has fairly straight grain, you can chop it out with a chisel faster than sawing.  First, saw the shoulders with a crosscut saw.

Drawer_runner-10 Drawer_runner-11

No need for a rip saw.  Once you saw the shoulders, the tenons can quickly be freed with a chisel and a mallet.  Examine the grain direction to avoid removing your tenon – the split created by the chisel will follow the grain!  A wide chisel is nice to have for this step.

Drawer_runner-12

Trial fit the runner into the rail.  The groove for the dust panel is only 1/4 inch deep, and the mortise in the rail (inline with the groove) 1/2 deep, so the runner is constrained and will not slide in the groove.

My back rails are cypress.  This swamp tree is perfect for a non-wear surface that does not show because it is relatively cheap, easily worked, and easy to find (in Memphis).  It is my secondary wood of choice when wear resistance is not needed.

Drawer_runner-14 Drawer_runner-13

Before you glue up the insides, counterbore and drill holes through the sub-top for the screws that will eventually be used to secure the top.  I like these little cup washers from Lee Valley.  They “convert” a regular countersunk screw into one having a flat behind the head.  I think it is less likely to split the wood and should allow wood movement with less resistance.  At least that is what I tell myself.

Drawer_runner-15

Check the fit of all rails and runners before applying glue.  I glued the front rails to the case sides, not the back rails because the sides of the case need room to move.  Sorry, I forgot to take pictures with the clamps on.  Yes, I used 1/4 inch plywood (gasp) for the panels.  I don’t care that it is not traditional.  As a panel, plywood is an excellent use of materials and saves time.  Feel free to make solid wood panels for your hidden components that are not structural.

Next up, the frame and panel back (and a little more plywood).

Bob Jones

Not quite ready for prime time

My last post on case assembly was only half of the story.  The other half is the ugly side of woodworking which is rarely shown in print for two reasons.

1 – Woodworking authors in magazines (or books) are better than I am. This is not just false humility, it’s an admission.  I work with wood 10 hours a week or less.

2 – It is too embarrassing to publish ugliness.  I suspect this is the primary reason.

So, here is some ugliness and my plan to deal with it.  I hope this will help other builders who are less than professional.

Case_Glueup_10

Here is the first half of the bad news.  My vertical divider split in two places (see the shadow lines) due to aggressive wedging action.  Stink.

Case_Glueup_11

Here is the second half of the bad news, which added insult to injury.  The case is not square.  It is out of square by about 1/8-inch over the diagonal.  This problem is made worse by the fact that not every joint is uniformly out-of-square.  Double stink.  I can’t explain that at all.  

Noticing these “opportunities” during assembly almost made me mad enough to build a fire and take care of the situation.  As those heated thoughts churned in my mind, I realized the need to quit before doing something rash.  Sleep did not come easily that night.

The next day I assessed the situation more calmly and formulated a plan.

1 – Deal with the splits?  Nope.  I’m doing almost nothing about them. Every joint of the case is tight and the splits are not visible unless the bottom drawers are removed.  I see no reason for the splits to open further.  I may need to smooth the surface a little for the drawers to move easily, but that is it.

2 – Non-square case fix?  I’ll build each drawer (and the case back) at the angles needed.  It should not be much harder than square drawers, but it is aggravating.  Such is life.  All’s well that ends well, so I hope this ends well.

Are there some valuable lessons here?  I think so.  First lesson – The next time I use a wedged mortise and tenon joint, I will use two separate wedges per tenon, like I saw on a Rob Cosman video.  That tightens the joint, but divides the wedging over two places and should make it less likely to split the tenon board.  Second lesson – I’m not ready to build with wood at a professional level, and I’m fine with that.

Bob Jones