

You might think that the Internet needs another plane restoration “how-to” about as much as it needs more social networking. I would disagree. I have read lots of restoration instructions and they are each different. Most involve using things like wire wheels or citric acid to remove any evidence of age and require owning things like electric buffers. I don’t have a grinder/buffer and I wanted to restore a few Stanley’s without removing all of their hard-earned patina. Considering my “beginner / intermediate” woodworker status, I decided to find a way to clean up some nice “user grade” planes and do it in a way that anyone could repeat. What better way than to follow the rules of the Popular Woodworking section “I Can Do That”. I am a big fan of that section because that level of woodwork is how I got into woodworking.
The rule – a project must be possible with only things purchased at the local hardware store or lumberyard. I added one stop to it – the car parts store. Here we go!
First, the case for restoration. Many old planes do not need to be refinished, but I bought several Stanley planes that only a mother could love. See the pictures. There was plenty of rust, much lost jappanning, and many had botched paint jobs. All of the metal was in good shape without cracks or a lot of pitting. These planes in their current condition were not “collector” grade, so don’t get upset that I painted them.
My starting point – rust, grime, and multiple bad paint jobs
I started by taking the planes apart and washing the grime off in the kitchen sink. Outside with a garden hose would have been smarter. Don’t worry about flash rust; we will get that off later. I mentioned earlier that my objective was to remove no more character than necessary, so I wanted stripping/cleaning tactics that did not require scrapping or buffing. Here is a shot of the things I used in the cleaning and painting process. All of this came from AutoZone. It may look like a lot to buy, but this will last for several planes.

Supplies needed to refinish the metal parts (Thanks to RUST-OLEUM! the Evapo-rust is optional)
Start with the aircraft remover to remove the jappanning and bad paint jobs from the frogs and the bodies. It is super simple to use. In a properly ventilated area spray on, wait 10 minutes, wipe off with a plastic or wooden scraper. Make sure the temp is +70F. One application got 90% of the paint, the second try got the rest. The paint just bubbles up. This stuff is powerful so wear good safety gear. Occasional scrubbing with the brass brush helped remove the really stubborn finish.

After a few minutes with the aircraft stripper the paint bubbles off
Now that the jappaning is gone, it is time to remove all rust. For all visible metal I used the Rust-Oleum Rust Stripper. This is really cool stuff that overcomes the 2 problems with Evapo-Rust (another great product). The rust stripper is a gel, so it is perfect for that Number 8 bench plane because you just spread it on, wait 10 minutes, and wash it off. No need to submerge the bodies in a big tub. Beware, the stuff stinks. The other nice part is that it leaves the parts nice and clean, but not too clean. The metal still shows some patina/age.

This plane has been stripped of all paint and the rust will be removed next without scrapping with anything more serious than a handheld brass brush
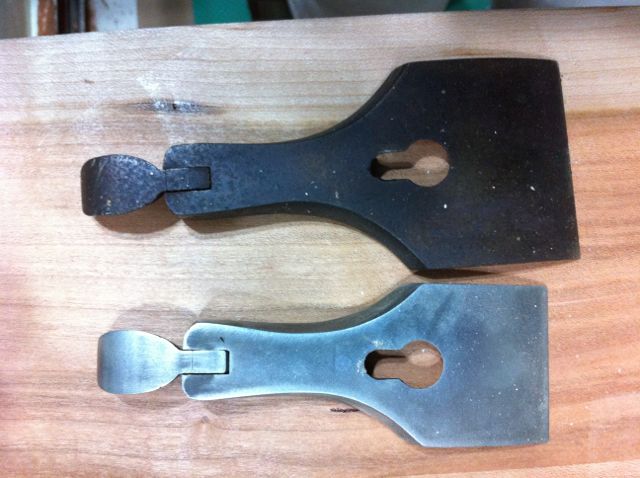
Typical lever caps before and after the rust stripper – no wire wheels needed
According to the rust stripper instructions you should rinse with water. Do this OUTSIDE. Dry the planes immediately after rinsing. Now comes the fun part, painting. There are a few problems to consider.
- Replicating the look or jappanning
- Not getting paint on places that shouldn’t have paint.
The solution to problem 1 was found at http://www.RexMill.com – Motor Paint (not the ultra high temp stuff). I used the Rust-Oleum version, because that is what my local store carried. It looks great!
The solution to problem 2 is petroleum jelly and a few cotton swabs. I came up with this after looking online at people who were using blue tape to cover parts of plane bodies and frogs – what a PAIN! Petroleum jelly is easy and fast. Just wipe a little on anywhere that you don’t want paint. Use a rag on the plane sides and a cotton swab as an applicator in tight spots (like the frog). Beware that paint will not stick to any jellied surface, so don’t goop it on. Plan not to touch or move the plane after you apply the jelly until you are done painting.
Next, spray on the primer. I applied 2 light coats. Keep that spray paint can MOVING. You can really see the jelly coated surfaces now.
After 2 light coats of primer you can see the shiny areas where I applied petroleum jelly to screw holes and areas that touch the frog. This paint will wipe off easily.
When the primer is dry you are ready for the motor paint. Read the instructions! I applied 6 light coats. Apply each coat about 20 minutes after the previous coat. It looks wet, but go ahead. Better to go light because the paint builds fast. Note that the paint does shrink a bit while drying so go a little thicker than you think you need. Do not wait more than 45 minutes to apply another coat. After painting and removing the jelly, your plane should look like this.
After painting the final coats and rubbing/scraping off the petroleum jelly
Look at the raised letters to get an idea of how thick the paint is getting. After you get the thickness you want, wait. Plan ahead again, because you should not move the plane for at least 24 hours (I waited 48). After 2 days you will see the miracle of the jelly. Use a paper towel and/or a small piece of wood and wipe the paint off the plane sides and any other spot you treated. See the picture of the paint being wiped off the frog. Man, that is fun. It is messy, but requires no effort. Be careful in this step, because the paint is not fully cured and it is easily damaged! After you wipe off most of the painted jelly put the plane aside and forget about it for 2 weeks. The can says 1 week, but it is wrong.

After 2 days of curing I used a wooden craft stick to wipe off the painted petroleum jelly. This one is half wiped – it is very easy
After 2 weeks of paint curing you can clean the parts with dry paper towels to get off the petroleum jelly film. It is a bit messy. I followed the same process with the frogs. The primary difference is the frogs need more petroleum jelly and I only used 3 coats of motor paint. Here are a few shots of before and after.


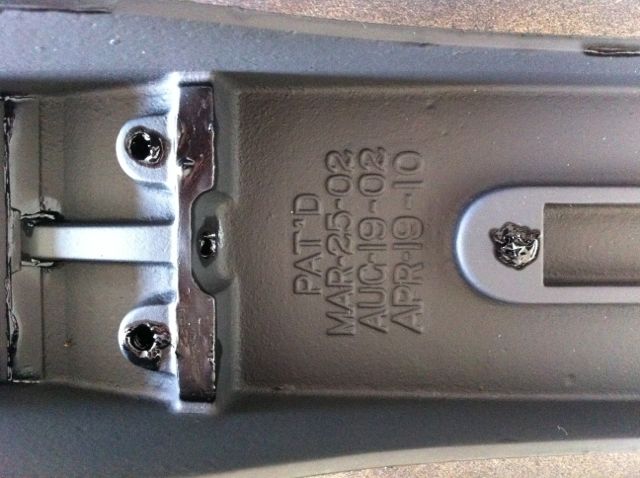
“As found” top view (left) and after refinishing (right). Note how well the petroleum jelly protected the machined surfaces.


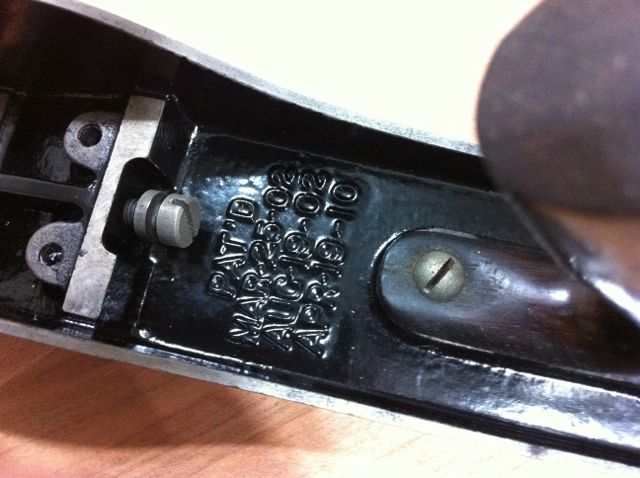
“As found” bottom view (left) and refinished bottom view (right). Don’t forget the jelly on the bottom surfaces!!
With the small bits that do not show I used Evapo-Rust. The stuff is super easy, not smelly, and requires no effort. There are only 2 areas for improvement a) parts have to be submerged and b) it leaves a film that is very difficult to remove. So I just used it on the smaller parts that do not really show.
The picture below is 1 frog cleaned with Evapo-Rust and one with Rust-Oleum Rust Stripper. Note the difference in color. All lever caps and plane bodies got Rust-Oleum, all frogs and screws got Evapo-Rust baths.

Frogs after cleaning with Evapo-Rust (left) and Rust-Oleum (right)
2 Optional Steps (Brass and Wood)
I cleaned the brass components. You don’t have to. I wanted my brass to match the rest of the plane with some age but no abuse. Brasso is the key. There are many people on the internet who recommend using harsh methods that give perfectly shinny brass (lathes & drills) but I wanted my brass clean – not new. Any easy way to do this is with Brasso and a toothbrush. A few minutes of gentle brushing and the brass will look much better and you will not remove all patina.

Before and after Brasso – use a toothbrush on the knobs to get in all the crevices
I bought planes with solid wooden handles and I opted to do nothing to them. The handles help show the age of the plane and they are plenty comfortable as they were. I have reshaped uncomfortable handles with a rasp and sandpaper and been satisfied with the results. Also, if they were painted I would remove the paint with the aircraft remover. I hate a painted handle.

If you want to take it to the next level buy a replacement iron and cap iron
Tuning
David Charlesworth wrote an article for FWW some years ago on tuning hand planes that cannot be beat. It is available online. I highly recommend it, but if you want my version, keep reading.
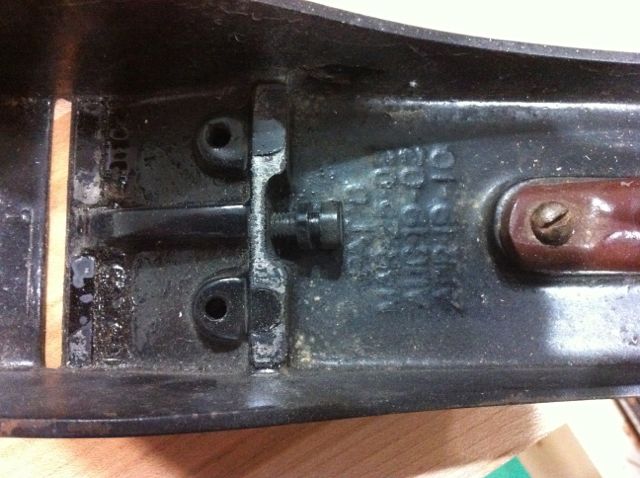
Once everything is clean and rust-free, I start the tuning process by making the frog sit flat in the body. Don’t skip this step! If your frog does not mate properly with the body then your plane will not stay in the cut (ask me how I know this…). I start by putting the frog in place and testing for rocking. You can use feeler gauges ($5 at autozone) to identify big gaps. After your feeler gauges say you are finished, move to a red permanent marker. Mark on the frog in the 3 areas that mate with the plane body.
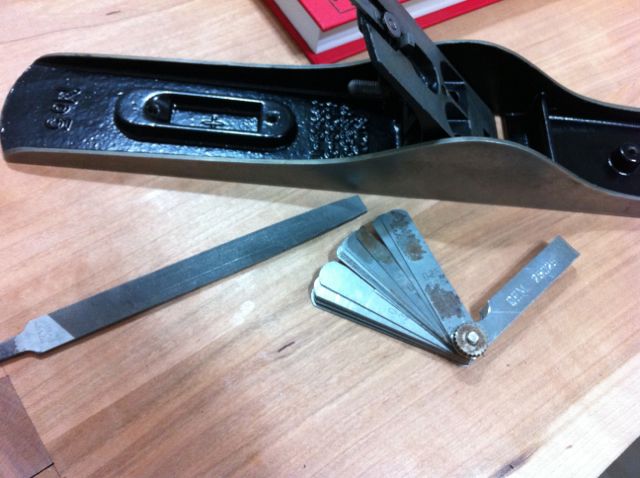
Supplies needed to “tune” the frog. Feeler gages, red marker, and a fine file.
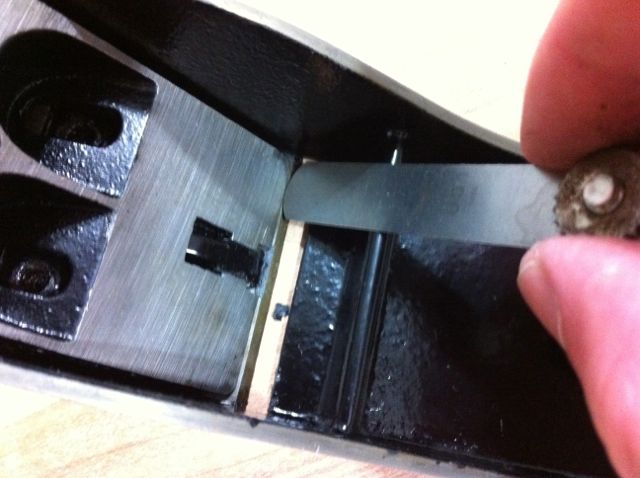
Check for gaps with the feeler gauges first, then with a marker.
Mate the frog to the body (without screws) and move it around a bit while applying downward pressure. Now take the frog off and look for color transfer to determine where the high spots are. Keep removing metal until you get good contact at the 4 corners. I think this is the most difficult part of the process. It is easy to get the frog parts flat with sandpaper stuck to a flat surface (granite tile or glass).
What is not easy (for me) is getting the areas down in the plane body nice and flat. A really dull hardware store chisel works ok as a scraper. Be very careful and check the fit often. I think this is the most difficult part of this whole process.
Once the frog seats properly, reassemble the plane and prepare to flatten the bottom. How flat the bottom needs to be is subject to debate, but no one argues that flat is bad so I flatten all to a “reasonable” level. I use regular sheets of 60 and 100 grit sandpaper that I stick down to a granite slab with 3M spray adhesive. I got the granite slab for free because it was a scrap piece that was a sink cutout from a countertop install.

Any flat surface will do but granite is nice. Use a magnet to pick up the filings occasionally.
Use the 60 and 100 grit to get it flat, but don’t stop there. Next, use finer grits with a sanding block (by hand). This speeds up the process and does not hurt the flatness because you are just removing scratches from the previous grit. I go up to +400 grit with the sanding block. I have stopped at 150 grit, but I noticed that those planes had considerably more friction than my Lee Valley planes that are finished so nicely.
Once the bottoms are flat, I use a file to slightly round the bottom edges and lightly sand the bottom of the throat to prevent plane tracks in the wood. The last steps involve the blade. Everything needs to sit FLAT. Use a small file (or sandpaper on granite) to get the “face” of the frog so the blade sits flat. Then make sure the chip breaker sits flat against the blade, and the cap iron sits flat against the chip breaker. Now sharpen the blade by your preferred method, set your iron, and get to work!

I hope you enjoyed this post on how to restore Stanley bench planes. I have used it on several and they all work great.
*EDIT* I later wrote a more detailed tuning explanation with better pictures here. If you find this useful, feel free to leave a comment!
Bob Jones

Pingback: Minimal Bench Plane Tuning | The Christian Tool Cabinet
Pingback: Prep for upcoming Bench Plane class | The Christian Tool Cabinet
Pingback: Restoring a Stanley #10 – Part 1 | thewoodworkingconsultant
Bob, you have to wait two weeks after its painted? What happens if you dont?
The paint should be applied in many coats to get something that is very thick (for paint). If you don’t wait for it to fully cure, the paint will be soft and prone to damage. Use lots of patience and wait for it to fully cure/harden.
Can you bake it on? Like say 150 degrees for an hour? When painting an engine the paint cures as the block gets hot. It’s probably not a good idea to blast it in the oven at 500 degrees in fear of warping the plane but maybe low heat like I said above? Waiting two weeks is like just buying a Ferarri but not being able to take it out for a spin in 14 days! Yikes! Lol.
Not sure about baking. Let me know what happened if you try it.
I just bought a beautiful Sargent #409 plane VBM Type 3 on Ebay with the top part of the frog that was completely cut off with a hacksaw. (What the heck!), no adjustment knob and no yoke. Anyway, i paid 15 bucks for it and ill test that bed in the oven. Ill let you know. I just painted a Sargent 414 and it came out great but I pulled the tape off the masked areas and it messed up a tiny section. So mad! First time using this paint though. Lessons learned.
Bob, I didn’t test the paint in the oven because my wife said she would castrate me but I did test it with a heat gun and in just 15 minutes, paint was cured. I waited about 3 hours after the final coat (I applied 2 primer coats and 3 Duplicolor coats). I kept a distance of about 6 inches the whole time (on the lowest setting) directed to the painted areas but then i realized I just needed to heat the base not the painted areas. SO then I just put the heat to the sides, bottom and occasionally to the painted areas. I just kept the plane hot enough to where I could hold it but not for long. Then i let it cool on its own and checked it 20 minutes later. It was cured. I couldn’t chip the paint.
At first though, I tried chipping it with my nail while it was hot and it chipped easily so i thought it wasn’t working but once it cooled, it was very hard to chip. You can still lightly scratch it if you run your nails from top to bottom though but MILES better from waited 7 to 14 days.
I painted a Sargent 414 last week and I checked it yesterday. It was still chipping very easily. I actually taped a section off on it to repaint a small chip and when i pulled the tape off, a chunk of paint came right off with it. I was pretty angry, LOL. My conclusion is that you can definitely speed up the process with the heat gun, no doubt. I’m currently painting a Union X No 5 and ill be using the heat gun, for sure.
Sounds great. Heat em up! Good move keeping it out of the oven.