Three legged stool – 2 year build!

Forgive the low quality cell phone pic, but here is my best attempt at a staked stool.

I’ve been away from woodworking for too long and now it’s time to build again. I mentioned this stool in my last post as a design in process. I now have a finalized design that I want to share with the inter webs. I need to take a few higher quality pictures and improve my build notes, but I think this picture will show the intermediate builder everything critical to construction.

Until I take time to make a complete build write up, who wants to play a little game? What can you gather about this build from the image? The answer (shared as a comment) with the greatest insight wins. Hint – there is one subtle joinery technique that makes this build super simple. Good luck guessing!

One more question. I’ve given a little thought to turning this project into a weekend class. I live in the Memphis TN area. If you would have any interest in building this stool in a weekend, drop a comment below. You would not need any tools, skill, or lumber. I would cap the class at 4 students and we would meet in my shop. Timing is TBD.

Bob Jones

Quick update and local news

A few readers have asked if I’m still alive and/or building things out of wood.  I’m confirming both to the affirmative.  Thanks for the notes!  I suppose an update is in order.

All_T11s_1

You may have noticed that I just posted a lot of tools on my “for sale” page.  Don’t panic!  I haven’t quit woodworking and I’m not planning to die anytime soon.  I’m just reducing the number of tools that I have in my shop.  After my trip to a LN Hand Tool event, I’ve been hooked.  I’ve been switching over to LN planes (slowly) and I just haven’t been using the Stanleys as often.  I’m the type of person who can not keep things that I’m not using, so these tools can go to new homes if people will give me a fair price for them.

teacher

In other news, I’m scheduled to teach another hand plane class at the woodwork shop in Memphis, TN on April 25.  Watch that date – it may change to May.  I hope lots of people turn out because the class is always fun.  I really enjoy introducing people to the experience of using a well-tuned plane.  I never tire of seeing the fun people have when they experience how easy it is to surface wood with a sharp iron and good technique.

Now, for the “update”.  What have I been doing?  My middle daughter (call her K) expressed an interest in robotics a few months ago.  Thanks Disney and Big Hero 6.  I didn’t need much encouragement to pursue this interest since it involves making things and learning about new stuff.  I decided that building drones would be a fun way to teach/learn robotics, so that has consumed most of my shop time recently.

airplane_1 Airplane_4

Daughter (K) and nephew (J) really enjoy their time at the local R/C airfield.

Naturally, I’ve been working on what is called “scratch builds”.  Designing and building toys airplanes is just as fun as building furniture, it’s just a lot more temporary.  One crash and they are done.  I’ve developed a reputation at the R/C airfield for trying crazy designs – that fly a little crazy.

Airplane_3 Airplane_2

I can testify that a french workbench is also an excellent workbench for other building hobbies.

Least you think that I’m done with wood – fear not.  I’ve been working on some “staked furniture” as described by CS in his excellent new book.  I’m reading it now and will post a review when I’m done.  Suffice to say it is excellent and the techniques he describes can make the process of building nice furniture faster and easier than you think.  Buy it.

3_stools

Recent experiemental builds – 2 stools and a staked sawbench

Here are 3 things I’ve built recently as experiments.  The sawbench (far right) is a test of strength.  The legs are only 3/4 inch diameter at the top.  I wanted to test the limits of this staked technique.  It can hold 200 lbs with little trouble, providing the floor is not slippery.  That’s impressive considering how spindly the legs and top are.  It is super light, which is helpful for this shop appliance.  The carved stool on the left was an experiment in carving a seat.  Not great, but still surprisingly comfortable.  The stool in the middle is my best so far.  I plan to build 3 more like it next.  I should be able to do a build series on it, so stay tuned.  I think that’s all I can type for now.

Bob Jones

Too much for one post (spoon carving and events)

Spat_1

You could call this project a spoon, but I consider it a spatula.  It has no bowl, requires no concave blade (like a hook knife), and can be carved completely with a drawknife and very little skill.  How’s that for a fun project?  I gave a demo on this process some time back at the woodwork shop and I promised to write about it.  The promise was almost broken, but since I have not received any complaints, I guess it is ok that this post took a few months.

Spat_2 Spat_3

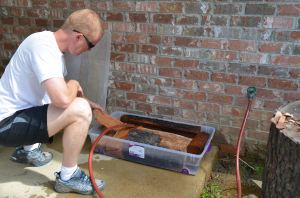
I’ll just jump right in.  The process is best started with firewood of some type.  Fruit woods work great, but lots of other woods work, too.  Stay away from oak or other “ring porous” hardwoods because the pores can harbor bacteria.  Anyway, split that chunk of firewood by any means available to you.  Here I am using a wedge, maul, and hardware store handsaw.

Spat_4 Spat_5

Keep working the wood into smaller pieces.  Wood likes to split in half.  As the pieces get thinner a froe can be very helpful, but not necessary in pieces this short.

Spat_6

Here’s a good “green woodworking” tip for those of us who don’t have time to use a whole log before it dries.  Wet your wood.  Get the pieces to rough size and soak them in any type of container that will hold them and water.  Here I used a plastic bin that was sold as a wrapping paper storage system.  If the wood is pretty dry, leave it here as long as you can (at least 2 weeks).  Reconstituted wood is not the same as fresh green, but it’s better than dry.

Spat_7

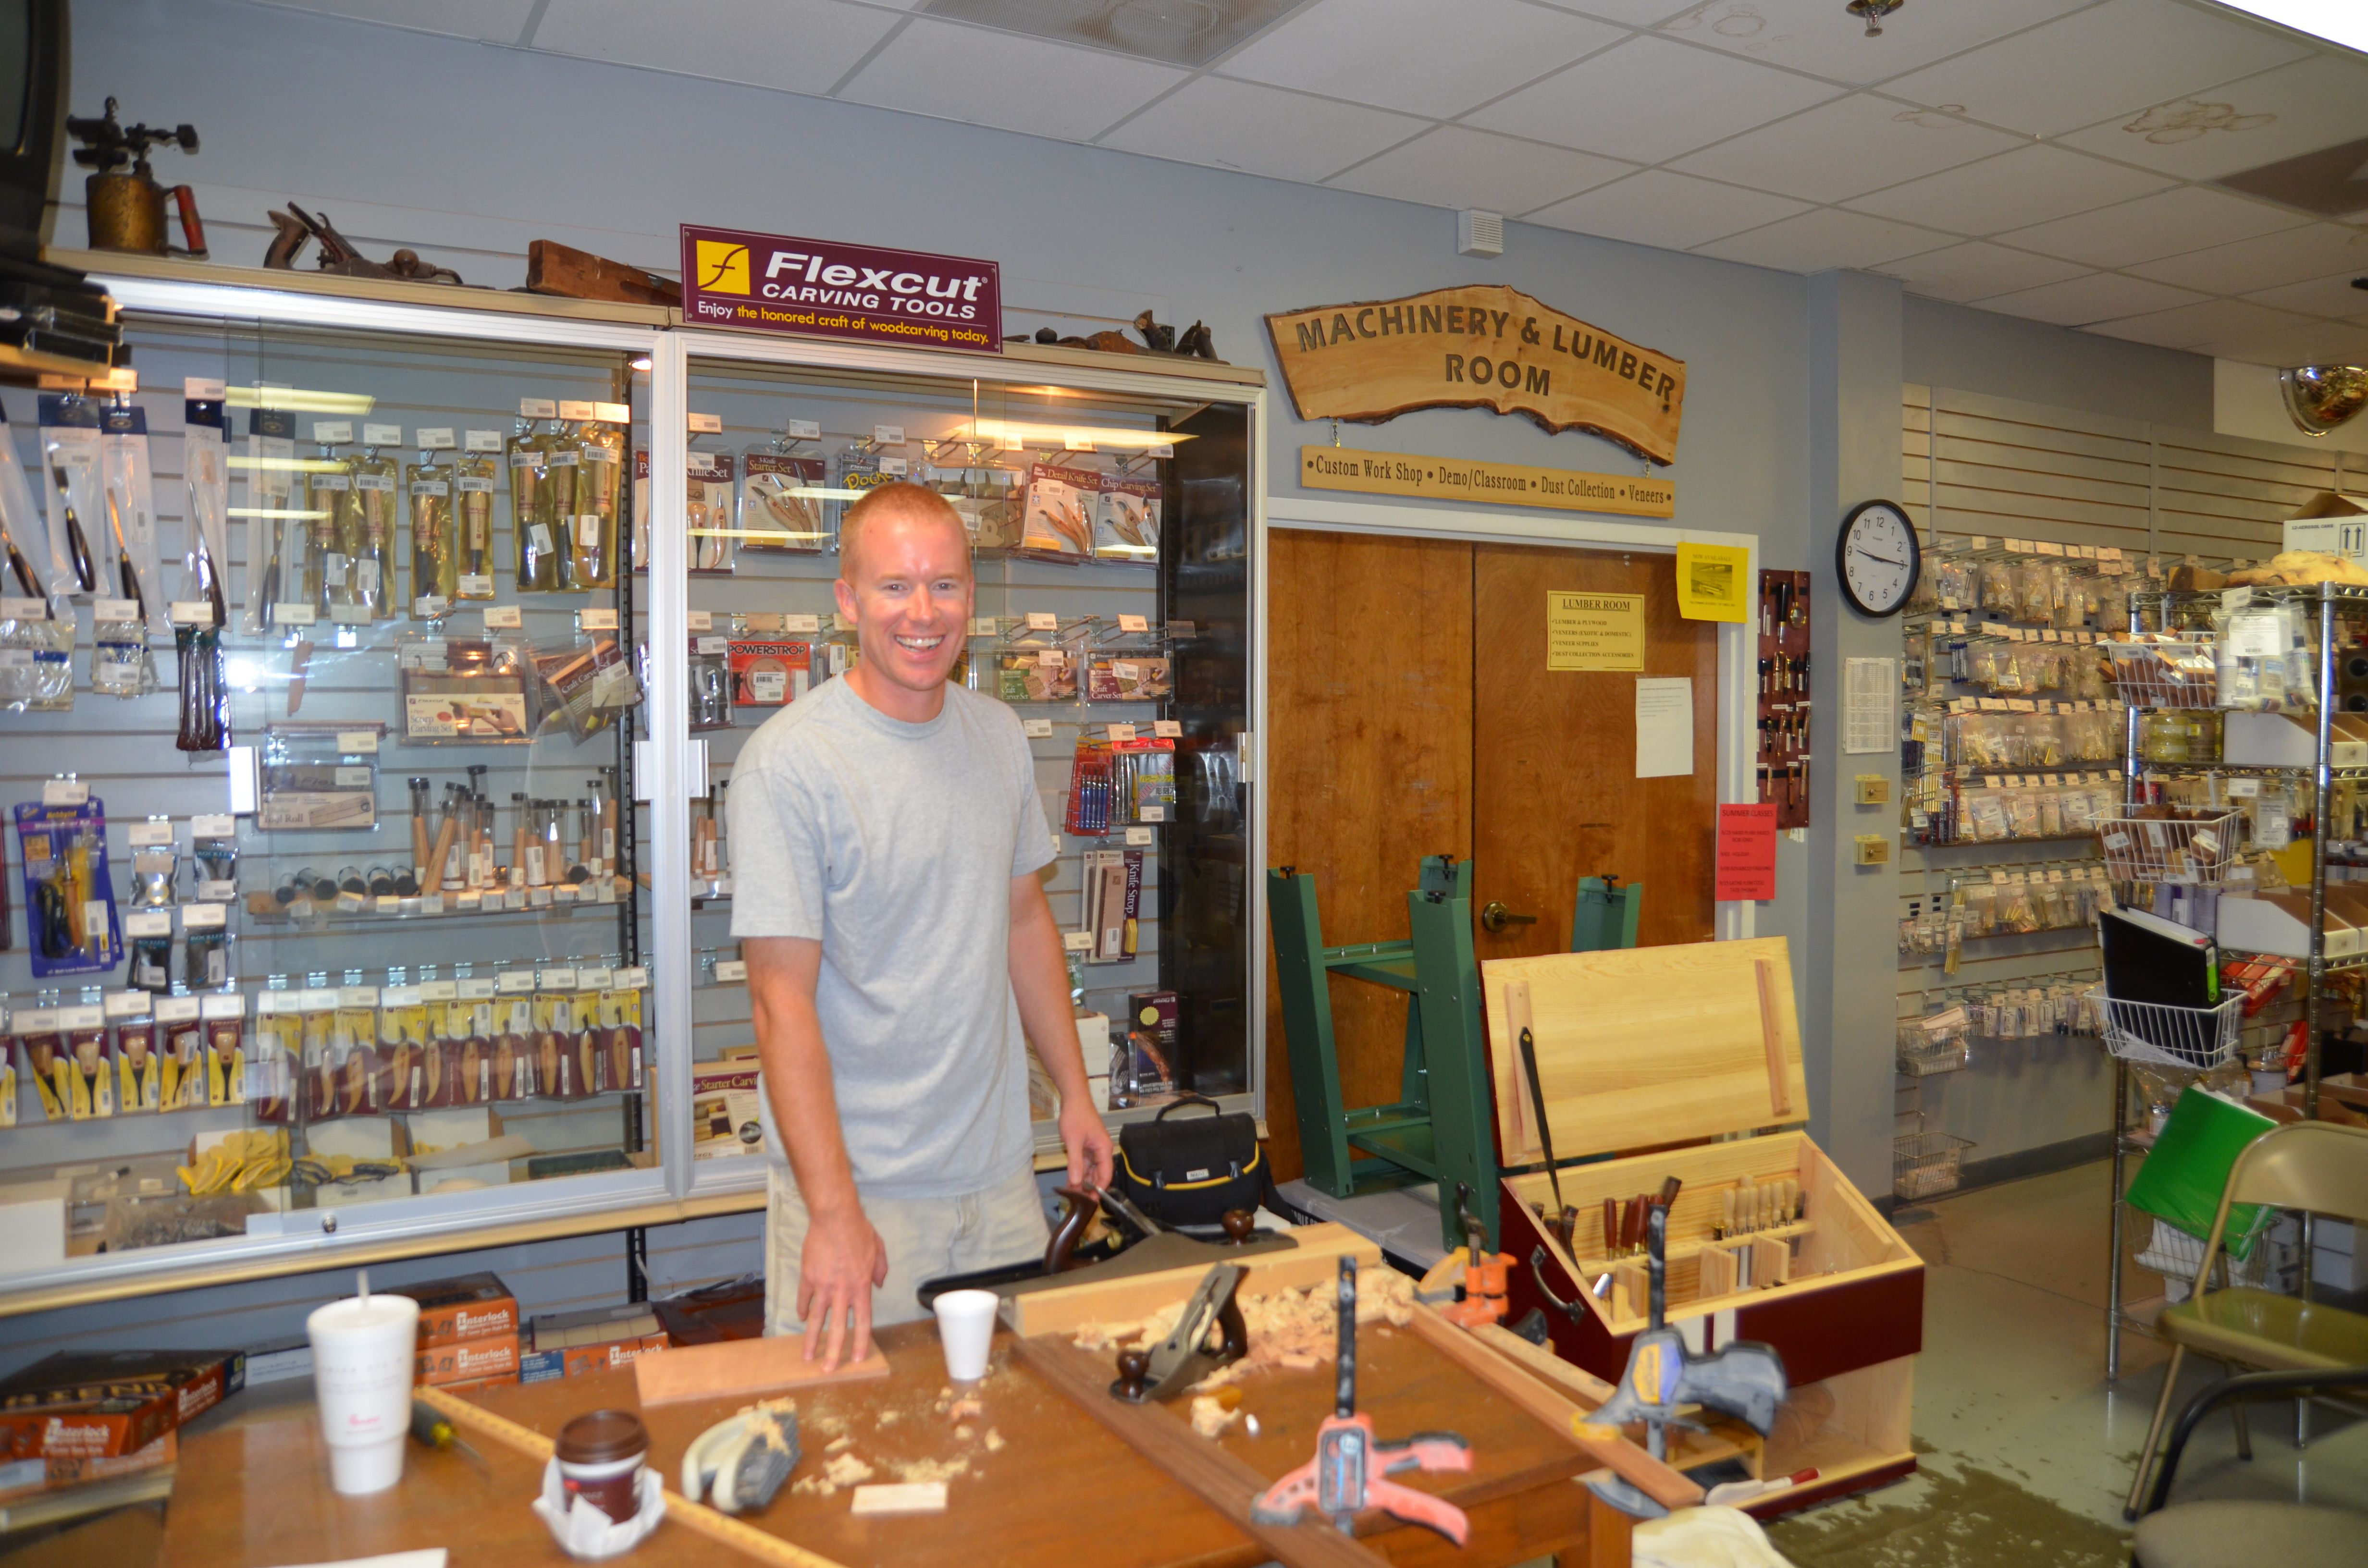
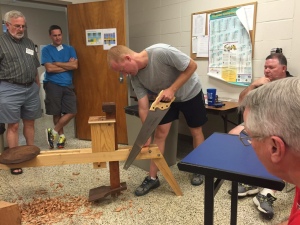
Once you have re-wet the spoon sized blank of wood, get in front of a crowd of about 30 woodworkers to finish the job.  Ok, you can do this alone but it’s way more fun with others.  Toward the end of summer I was invited to speak to a woodworking club in Tupelo, Mississippi (just down the road from home in Hernando).  The organizer, Marty, asked me to come speak to them.  I convinced him that I had nothing interesting to say, but I would be glad to show them how I carved a spatula.  This idea caught on and the club members really turned up in force to watch.

Spat_8 Spat_9

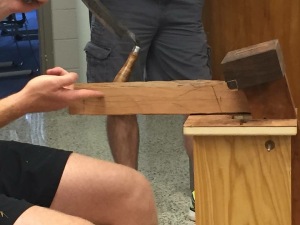
Back to the process – Work the blank to something that is rather flat.  This flat is where you draw the profile of the spatula.  It’s really helpful to draw a centerline and the shape to guide your eyes.  Notice that I’ve left waste wood beyond the big end to hold in the clamp.  The shaving horse has so much clamping force that this wood will inevitably get deformed.  Now, carve away, starting with the areas that require the most removal.

Spat_10

I really like the low profile head of this shaving horse.  It lets me work easily on both sides of the head which is very handy for carving!  Flip the spatula around a few times and remove wood from anywhere that needs to be lightened.  As the spatula gets thinner the work gets more interesting (and risky).  Starting with split wood, rather than sawn, makes these thin components stronger than they look.

Spat_11

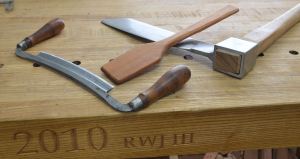
When the carving is complete, cut the spatula to length and finish up.  Give the spatula to one of your new friends, or keep it for your spouse in appreciation for her letting you do a little woodworking on Saturday.  With the spatula complete, it’s time for some family adventure.

Bike_trail_1

Yes, it’s a long bike.  Yes, we get a lot of funny looks.

Bike_trail_2

If you find yourself in the Tupelo, MS area with some free time, I highly suggest bringing your bicycle.  After the spatula carving demo my whole family went on a bike ride on the Tanglefoot Trail.  We only did 8 miles, but the trail is over 40 miles, it’s mostly flat, and it’s paved!

Bike_trail_3

Not a bicyclist?  No problem.  New Albany (trailhead for Tanglefoot) has a great little family friendly restaurant in their picture perfect downtown.  Fat Luey’s serves up some great catfish tacos (a new personal Mississippi favorite) and sweet potato fries.  Seriously great food.

DSC_7667

Curious about my next woodworking event?  No need to wait, it will be this weekend.  Yep, on Halloween day (2015) I’m giving a free demo at the Woodwork Shop on making three legged stools.  The process is super simple and requires few tools.  I hope to see some blog readers there, just don’t be late.  I’ve got three little girls that need to beg for obscene amounts of candy from neighbors.

Bob Jones

Laser guided drilling

Laser_guide_1

Yes, I use an electric drill.  This one has enough torque to break your wrist and as long as you have a source of 120V, it’s fantastic.

Last summer I learned a handy technique for free hand drilling and reaming from Greg Pennington.  It has taken me a while to replicate his setup, but I have it now.  I don’t own a drill press (anymore), but these two lasers make it possible for me to free hand drill holes with impressive accuracy.

Laser_guide_2

Twin guides.  Put them 90 degrees apart and you can accurately produce holes at any angle.  I made mine from scraps, but here are a few ideas to guide your own designs.

  • Make the base heavy to prevent them from toppling in use.
  • Make the guide tall enough that the lasers will wrap around the end of your drill.  I would make these another inch or two taller if I made them again.
  • The big wheel on the back is for angular adjustments.  Making the wheel big actually makes small adjustments easier.  Try it.
  • These lasers have magnets on the bottom, so attaching them to the stand is easy with a washer glued to the platform.

Laser_guide_3

“Calibrating” the drill

After the guides are made, it is time to “calibrate” your drill(s).  This means drawing lines on the drill that align with the axis of the chuck.  These lines will be the targets for the lasers.  To get an accurate alignment I chucked up a long section of 1/4 inch rod.  This gives a long reference for the center of the chuck.  I then aligned a laser to the center of that rod along its length and projected the line down the drill.  See the laser lighting up the center of the rod? That alignment took some time and patience.

Marking a clear line on the drill motor is another challenge.  I had a hard time finding a marker that would leave a fine, contrasting mark on the plastic surfaces of the drill.  After a few failures of pens and markers, a white gel pen from a massive internet based commerce did the trick.

Laser_guide_4

“X” marks the spot.  Notice the white lines from my gel pen vs. the laser lines. 

Here is a first person view of the goal – lasers that intersect your calibration lines (I’m off a little because I’m holding the camera).   With any luck, I’ll demonstrate how these are used to drill mortises in the bottom of chair seats, but it’s not quite time for that yet.

Bob Jones

Got plan(e)s tomorrow night?

plane_class3

Late notice – as always.  I’m teaching a hand plane class tomorrow night at the Woodworks shop (June 1st, 2015).  In this class I focus on joinery planes like the router plane and rabbet planes (shoulder, fillister, and block).  I demo their practical applications for power-tool woodworkers and hand tool folks, too.  Everyone will be able to try out as many of them as I own.

Just to add something new this class, I’m bringing my shooting board.  I’m sure we will end up sharpening some tools and using bench planes too.  I’ll even bring my grinder in case anyone wants to practice free-hand grinding.  It should be a big time.  If you plan to come, sign up quickly.  If people don’t pre-register, then the class will not happen.

DTC_outside  DTC_inside

If nothing else, you can poke around my Dutch Tool Chest.  It’s always popular with the students.  I hope to see you tomorrow night!

Bob Jones

Roubo Panel Gaguge – Build and Finish

RPG_build1

In the last post, I left off with the pieces needed for the Roubo Panel Gauge.  You see here the walnut for the body resting on the cherry for the arm.

RPG_build9

Here is a shot of the end of the arm.  I decided on a 5 degree taper for each side of the arm (10 deg total).  I don’t have a good reason for 10 degrees other than many people in chair making use 6 degrees and some use 12 degrees, so rather than debate who is right, I took the political position and went for the middle ground.  I don’t remember the exact dimensions of the arm, but it is close to 1 inch square and 20 inches long.

RPG_build2

Tapered mortises are more difficult to layout than rectangular ones.  I marked the first line, then used the actual bar to determine the location of the second one.  I suggest you make the mortise a little tighter than you think you should.  It is easier to open the mortise up a little than to close it.

RPG_build3

With the tapered hole marked out (see the white pencil marks) I used a mortise chisel to chop out parallel mortises.  The middle was then easily removed.  I considered using a drill to define the mortise, but I remembered the wise words of Mr Robert Wearing that drilling does not make mortising any easier or more accurate.  He sure was right.  Just go at it with a chisel and don’t be scared.

RPG_build5

The tapered arm fit perfectly the first time I tried the fit.  Yeah, right.  I pared down to the line with a super sharp bench chisel and fine tuned the fit several times to get it right.  The bar had a tendency to seat further on one side of the body, making the gauge look like a mess.  Shaving tiny slivers of wood here and there did the trick to level the arm out.  How did I know where to remove slivers of wood?  Move the arm around in the mortise with some force.  Areas that rub will show a little burnishing.  Remove the burnished areas from the mortise to get more consistent contact.

RPG_build6.

This was a good time to shape the curve of the body.  Notice the use of the leg vise to hold the body flush with the bench top for drawing the curvature. I don’t deal with full-sized prints.

RPG_build7

I sawed the body to rough shape and screwed in a 1/4 inch threaded insert at the top center.  These inserts are really simple to install and function better than a machine screw threaded directly into wood.  I faired the curves and rounded the profile with my new Lie Nielsen spokeshave – it is a wonderful tool.

RPG_build8

The body of the gauge gets a rabbet at the bottom of one side.  This creates the reference surfaces of the gauge, so do your level best to make the rabbet parallel to the body in width and depth.  A good marking gauge helps guide the final endpoints of the rabbet – don’t depend on stops built into the plane.  That rabbet completes the body.

RPG_build10

It’s time to add some flare to the gauge.  In the top of the arm I plowed a 3/8 inch wide groove to house a piece of brass.  The brass was 3/8 inch wide and 1/4 inch thick.  This is a functional upgrade as well as aesthetic.  The arm is locked in place by a screw in the top of the body.  That screw would chew up the wooden arm if left unprotected.  The brass was epoxied into the groove and later sanded to clean it all up.

RPG_build11

The pencil holder is very sophisticated.  I drilled a vertical hole for the pencil that was 1.5 inches from the end of the arm.  Closer to the end of the arm I drilled a perpendicular hole for a screw that will be used to tighten the grip on the pencil.  To make the grip more effective, I sawed a kerf through the end of the arm into the pencil hole.

RPG_build12

The perpendicular hole received another threaded insert, but this one was considerably smaller (Number 8).  To get the insert in straight, I used a No 8 screw from the backside and manipulated it while driving with the screwdriver.  Getting the threaded inserts straight in the hole is the closest thing to a challenge in the process.

RPG_finished2

Insert a General pencil (premium pencil made in the USA) and give your new gauge a trial run.  I’m really happy with the fit and feel of mine.  The brass in the arm gives it surprising heft and a classy look.

RPG_finished

I finished my gauge with one coat of Boiled Lindseed Oil and one coat of wax.  I may go back to using wax more often rather than 6 to 8 coats of oil.  It is fast, easy, and looks great.  The only offense is the smell of the wax, but it fades after a few days.

There are a few take-aways from this build.

  • Read old woodworking related texts when you can.  They are full of ideas that are waiting to be rediscovered and put back into practice.
  • Starting with your current project(s), build everything to the best of your ability.  This includes fixtures and tools for the shop.  Always do your best and your best will improve.
  • If you are new to designing your own projects, a good place to start is with small things.  You can either succeed or fail quickly and try again.
  • Complete a project from time to time to prove that you can see one through to the end.

Bob Jones

It’s not Handworks

Manney_horse_1

But there is a free event that is hand tool related in Memphis, TN this Saturday (May 16, 2015) at 10:30. I will be giving a demo called “making a spatula from firewood” at the woodwork shop.  I know that spoon carving is all the rage, but spatulas are fast and easy.  There is no bowl so I carve the whole thing with a draw knife.

The Saturday demo’s are a great format and are always fun.  I’ve done a few on hand planes and I’m always surprised by how many people show up.  Must be because it’s free.

Anyway, I asked Mrs Rita if I could do something different this time and she encouraged this.  If the demo generates enough interest she may offer it as a Monday night class.  How would you like to leave a Monday night class with something you made that night?

So, if you can’t go to Handworks this weekend, come to the wood work shop and commiserate with some like minded folks.

Bob Jones

Roubo Panel Gauge – Design

RPG_finished

Let’s get the punch line out of the way.  Here is the finished panel gauge and the source of inspiration.  Now we return you to your regularly scheduled “how to build it” segment. Thanks for watching.

Between big projects I like to have a few quick wins.  Some would (rightly) call this stalling the next big thing, but it also lets me feel the satisfaction of completion more often.  I decided that my tool cabinet could benefit from a few upgrades and I started with my old panel gauge.

old_panel_gauge

My old panel gauge is no slouch, but it offers several opportunities for improvement.

This gauge is based in a classic and common style with a wedge-locked rectangular beam and a body with concave and convex curves.  It works and takes little time to construct.  The pencil is press fit into it’s home and the wedge locks the beam just enough to call itself locked. I was pretty happy with this little gauge until I read Roubo’s description of a good trammel gauge.

RPG_design1

Inspiration flows from every page of “To Make as Perfectly as Possible“.

Roubo described how wedge locked beams were the norm, but were fussy in use (my paraphrase).  He described his gauge as a big improvement with it’s screw lock and trapezoidal beam.  This made a lot of sense to me and after reading this I noticed that when setting my panel gauge I typically had to knock the wedge and beam in and out of place a few times to get the setting right.  Having no vision for anything better, I was satisfied with that.  Roubo changed my expectation of a well functioning gauge and I added it to my build list.

RPG_design3 RPG_design2

No, I don’t typically doodle in marker, but I figured it would show up better in pictures.  I have no interest in CAD at home.

I started the project by playing with designs for the body.  I couldn’t copy Roubo, because he actually drew a set of trammels.  I turned to “By Hand and Eye” for guidance on design.  I used their “module” approach to design and it was really fun.  Since this gauge is to be handheld, I made my handspan the module.  This set the length of the body.  The rest of the dimensions were felt out using a compass, dividers, and eraser.

RPG_build1

With the body designed, I went to my scrap pile to see what I could scratch up.  It looks like my new gauge will also be walnut and cherry.  If you think that is all I use, you are forgetting about cypress.

Bob Jones

Constitution Village and spottings of “Furniture of Necessity”

great_wheel

Our tour guide had no problem using a little child labor to turn the “great wheel” lathe.

On a recent family vacation to Huntsville, Alabama we made a stop at a living history museum.  It was a small, low key place, but I really enjoyed the visit.  My reason for wanting to visit was the cabinet shop.  I was very comfortable in there.  I prided myself on knowing what everything in the shop was and how it was used.  Sorry if that sounds prideful, but it was a simple shop and I’ve been studying this craft for a little while now.  The cabinet shop seemed strangely modern to me, for a living history museum.  There were few actual antiques and most tools were modern reproductions.  The tour guide was very friendly and I wanted so badly to step in an do the working while he did the talking.  Not wanting to be guided off the property, I restrained myself.  Maybe next time.

coffin

The cabinet shop didn’t just have tools.  It also held some of the typical projects completed therein.  The walls were lined with windsor chairs and this casket was on top of a workbench.  The first thing this brought to mind was a book that Christopher Schwarz is working on called “Furniture of Necessity“.  I tried to get Chris to name it something with “Permanence” in it, but he wasn’t moved.  Anyway, it was funny to see something that most woodworkers would consider an oddity as one of the primary objects of display in the shop.

chair-room

Sorry for the lighting – the chair is the one in the shade of the desk.

The tour also included a few houses.  Compared to other museums there was not much unique there, but I did spy this Windsor chair.  What caught my eye was the seat.  It looked like it was shaped only with a jack plane, like CS mentioned on his blog here.  It is similar to the one Chris is building, but with 4 legs (how boring).

simple_chair


It was hard to tell from across the room, but I think the scooping of this chair was more extensive than what CS did in his post.  I wanted to jump the velvet rope and give the chair a try, but I’m certain that would have embarrassed my wife into disowning me.  She is a rule follower for sure.  All in all, the museum was nice and I could have been happy to spend all day in that shop.  They really need someone there who knows how to sharpen tools.

Changing topics – thanks to everyone who looked over at my tools for sale page.  Double thanks to those who bought anything.  Most items sold quickly, but a few things remain.  I’ve dropped the prices of all remaining tools but I’m not likely to drop them further, so if you were waiting for a better deal now is the time to strike.

Bob Jones

A few good tools for you

18-T11Set-1

A matched set of Type 11 Stanley’s for today’s cheap, but discerning woodworker.

Not long after I started this blog, I opened a “for sale” page.  I closed that page after I sold all my extra tools.  Since that time I’ve hoarded gathered more great tools than I need (again) and reassessed my collection.  I can’t in good conscience keep all of these so I’m offering them up for sale.  See my for sale page for more info if you are looking for a few good tools to add to your shop.

1-big_sale

The whole bunch.  See anything you need?

20-2inchisel-3

Ground, honed, and ready to cleanly shave some wood fibers.

All of these tools will be ready to use, right out of the box.  Check my minimal plane tuning post to see how I do this for planes.  I aim to remove as little history (patina) as possible to get the tools back to 100% functional.  All of the planes are tuned to a level that I would start using them.  That means the plane soles are flat enough, the irons are very sharp, the cap irons bed nicely on the irons, and the frogs are stable on the plane beds.  These are the things that make a solid performing plane.  I expect users will continue to refine them, based on personal preferences (honing angles, iron camber, flattening soles, refinishing) and the work at hand.

Satisfaction guaranteed on all of these tools.  Just don’t expect to win a nano-thin shaving contest with the planes.  You can certainly tune them to that level, but I do not because it is a silly waste of time. Work is faster when you remove more wood at once without tear out.

Consider this a fund raiser to help me attend HandWorks.  I’m not likely to attend in person, but I will virtually attend by placing orders with at least a couple of the participants.  Oh wait, maybe I shouldn’t buy any more tools.

Bob Jones